Showing posts with label Bedroom. Show all posts

Firehouse Bedroom

I just completed another big build here on our little homestead and couldn't be happier with it. About 6 months ago, I realized that my favorite little firefighter was likely going to grow out of his custom toddler sized fire truck sometime in the next year and I sure didn't want to have to do the build in our cold rainy winter so I knew it would have to be done this summer. This summer has been a very busy one though so I just sat on the plans looking for my opportunity to pounce on the project.

Then it happened.

Last week I got my hands on a coupon to apply to my total purchase at my favorite local home improvement store so I finalized my blueprints and headed off to pick up the materials. They then sat on the front porch for a couple of days while I dreamed of busting out the tools. And then I saw my big opening - two different friends offered to take the kiddos out for some fun to give me some time to myself so I had 1.5 days without kids and boy did I make the best of them.

Please allow me to introduce to you the little guy's new Firehouse Bedroom:

Firehouse - Pano

And now a section-by-section tour with better pictures (the only way to take panoramic pics is with my phone, boo).

First of all, the ladder is accessible from outside the firehouse. This gives him more room to play inside. The door wall had to be set back from the main firehouse front due to the bedroom closet placement.

Firehouse - 9

If you peek in the window, you'll see all his firefighter costumes illuminated by the light big brother and I made for him before he was even born.

Firehouse - 7

His toddler bed sized firetruck fits perfectly in the garage, always ready to go out on a call.

Firehouse - 8

The little guy was all too happy to abandon the fire truck bed so he could start sleeping up top. I found this gorgeous quilt at a local thrift shop. I love the Americana color theme.

Firehouse - 13

His station emblem features the flaming F logo I created for his toddler bed.

Firehouse - 18

The door wall is hinged so that adults can get into the firehouse without having to go through the little door. It also gives us a way to help kiddos down the fire pole. Yes, the fire pole!

Firehouse - 6

I'd say my little firefighter is pretty happy with his new digs.

Firehouse Bedroom by Julie at Build, Sew, Reap http://www.buildsewreap.com/2016/08/firehouse-bedroom.html

Thank you for reading,
Julie


DIY Queen Sized Storage Bed

Believe it or not, my lack of blogging has nothing to do with the fact that I've had nothing to show, it's that I've been SUPER busy and can't seem to both take on all the projects I want to do AND take the pictures and post the projects. It weighs on my mind as I want to keep a log of my projects and I love sharing my ideas but it's been a struggle.

But, leaving all that behind, I have to share that I built a bed and I'm totally in love with it. We've been sleeping on a foam mattress sitting on plywood on top of a box springs foundation in a frame and not only is that not ideal support for the foam mattress but it's a ton of wasted storage space since the box springs are unnecessary.

I took inspiration from all of Pinterest as well as a few google images searches but have kept this Ana-White page open for weeks. I haven't had many big blocks of time to work on the project which really turned out for the best because I was able to change and adapt my original plan to create what I'm now so totally thrilled with.

So, without further rambling, here's my new bed:

Storage Bed - 6

There's a lot of great storage along each side of the bed. My biggest issue to solve was the shoe explosion and nowhere to put them in our small bedroom. Mr. BSR and I share a small closet and there's just not room for shoes unless I want my clothing dragging on them as I have a low hanging bar. So, now that problem is solved:

Storage Bed - 7

The headboard and footboards are built with 4x4 supports, pre-cut MDF trim in various sizes, and some beautifully weathered fence boards I recycled from a local mom's garden. I love how they're a bit wonky.

Storage Bed - 8


Storage Bed - 9

BUT WAIT! It gets better!

When I designed the side storage units, I didn't want them to be so deep that we'd be constantly losing stuff to the back of the cubbies so there's still a ton of space up the middle of the bed.

Storage Bed - 12

I have one large size storage box shoved in there for this picture (it caught the flash from the camera) so you can see that it's really deep and actually quite wide. I plan to stash a bunch of out of season clothing in there but for easy access to some storage, I built a drawer on wheels.

Storage Bed - 4

What a surprise, my cat is in the drawer. That boy was ALL UP IN MY BUSINESS throughout the build and I kept having to retrieve him from the center storage area. This gives you an idea of how big the drawer is though, that's a 150lb cat. Ok, just kidding, he's about 12lbs though, not a petite kitty.

I built a basic box out of some scrap wood then I added casters and attached it to the center panel of the footboard.

Storage Bed - 11

Also, I didn't finish the back of the headboard or the footboard because I love seeing the natural wood when I peek behind.

The whole drawer slides in and out from the outer frame of the footboard.

Storage Bed - 2

I'm so madly in love with my new bed.

Storage Bed - 1

Have you ever built a bed? I'd love to see your creations via a link in the comments on this post or on Facebook.


Thank you for reading,
Julie


The Bed To Beat All Beds - Specs

As promised, here are the specs for the Bed to Beat All Beds. I'll begin at the beginning with the measurements for the Ikea pieces so you'll have everything in one place.

These are based on the Ikea website:

Kura Bed
Length: 78 3/8 inches
Width:  41 3/8 inches

Trofast storage units (I used three of these)
Length: 39 inches
Depth: 17 3/8 inches
Height: 21 5/8 inches

Materials List:

  • 2 full sheets of plywood (please read all directions and consider how much weight will be on them before making a purchase - don't skimp)
  • 1 6+ foot long 2x6 - this will be for wall supports. 
  • A bunch (I bought a box, I like left over hardware) of screws a little longer than your plywood is thick (if you buy 1 inch plywood, go for 1.25 or 1.5 inch long screws for example)
  • A bunch of 3 inch long screws - these will go through the pieces of 2x6 into the studs in your wall, get good quality screws or even bolts if you want the added strength. I tend to go for more smaller screws over fewer bolts because I can handle the screws better than the bolts.
  • 6 8-foot long 2x2s - again, make sure these are straight, they often are not.
  • 1 indoor slide
  • Primer
  • Paint

Let's begin with the platform. I had 2 sheets of a plywood originally 4 feet by 8 feet cut to 96 by 30 inches and 78.375 by 26.375 inches. Please note, this means the pieces meet somewhere about in the middle of the bottom bunk. We should have purchased better quality / thicker plywood and since we didn't, we had to put a scrap piece of wood across that joint to make it stronger. Let this be a lesson to you to buy good, sturdy plywood.
Plywood Cuts
Please bear in mind you'll loose a little bit because of the saw blade thickness but if you cut for the platforms, you'll find that little bit of loss doesn't affect the slide enough to matter.

This next diagrams will attempt to show you in layers how the bed area stacks up. NOTE: These are not drawn to perfect scale, I'm just eyeballing it so it is close. This is a bird's eye view . . . if the bird had x-ray vision.

Base Layer Diagram
As you can see, this is the base layer - these are the components that hold up the bed. I've color coded them so you can see the following:

The platforms are supported by three 2 x 6 x 18 cuts of lumber (yellow rectangles) that are screwed into the studs with their tops level with the tops of the Trofast systems (21 5/8 inches high).

The Under-bed hideout
Under the bed - the hideout

There are also three Trofast frames in all (blue rectangles). One is set perpendicular to the back wall and the other two are up front parallel to the back wall. The two Trofasts end-to-end measured almost exactly the same as the length of the bed making them an excellent support system.

DSC05081The Bed to Beat All Beds

On top of the lumber and the Trofast storage sit the two platforms (black and red rectangles).

Now for the bed and slide and how they're situated over the platforms:

Bed and Slide Layout

The bed (green) is against the back wall and the front edge sits directly above the back edge of the Trofast storage units (I know the proportions are a bit off here).

The slide platform (orange) is partially supported by the second-from-the-top slat of the Kura bed:

Top of bedroom slide

It also sits on a 2x4 frame that is screwed into the studs in the wall.

DSC05826

The slide is supported by several vertical 2x2 posts that are cut at the appropriate angle. I wish I could tell you how I figured out that angle but I can't, it wasn't mathematical, it was a lot of marking and cutting (wrong) until I got it right. You can see two of the vertical supports here - one is pretty obvious but the other is against the wall by the nightlight under the slide.

Bedroom Slide

Please note - I couldn't put the slide against the wall because the window sill was in the way. Securing the slide would have been a lot easier if I could have just bolted it to the wall studs. The support by the nightlight is actually screwed into a 2x4 that is screwed into the studs. I painted most of that 2x4 green to blend with the wall.

DSC05828

Here's the third vertical support for the slide. This view is from the floor under the slide looking up. The support is screwed into the bed and goes all the way up to the bottom of the 2x4 on one side of the slide and is screwed in there as well.

DSC05841


I used lots of 2x2 lumber for support as well as to add bed rails for the lower bunk. I simply measured and cut one piece to be screwed in (angled the screws in from the back) vertically then measured and cut the two front horizontal pieces and two horizontal pieces for the end of the bed as well where we hang his Seattle Sounders soccer blanket.

The Bed to Beat All Beds

The little bookshelf above the pillows was just some scrap shelving I have resting on supports.

DSC05832


DSC05831

DSC05847

I hope this details out enough for you to create your own Kura bed indoor playground. If you have questions, please leave them in the comments or contact me directly. If I need to add to this post, I certainly can. I wish I had software to draw out better specs but I couldn't find anything to fit my needs that wouldn't have taken weeks to learn how to use. I can provide more photos if you think they would help you better understand the layout.

Thank you for reading,
Julie

How to make an indoor slide

I've had lots of requests for information on how to build out the Kura bed as we did for the Snickerdoodle and I'm still working on that post but wanted to pull the slide assembly into a different post. These instructions outline how to build a basic indoor slide. I didn't take pictures as we worked so I'm including pictures of the completed slide and scraps left over from the project. Hopefully they'll provide enough information.

Materials:
  • 18 inch wide strip of sturdy plywood - length depends on your needs, mine was 7 1/2 feet long
  • 18 inch wide strip of Thrifty White Hardwood Panel (or something else long enough and slippery)
  • 2 8-foot long 2x4s - these can be basic studs, no need for fancy materials but make sure you get straight ones with few blemishes that you'll have to sand out. These will be the edges of the slide so you don't want them splintery.
  • 4x4 for base of slide
  • Adhesive
  • Optional: Wood shims

Equipment:
  • Table saw
  • Dado Set (or a lot of patience to run your 2x4s through multiple times to create a wide enough slot for the plywood and hardwood panel to sit in)
  • Miter Saw
  • Hand sander
Using your hand sander, make sure all rough knots and edges and any potential splinters are well smoothed out of the 2x4s. Next, prime and paint them. It's much easier to do it now than later. 

Stack your plywood and hardwood panel together and measure how thick they are. 

hardwood plywood stack
We used 3/4 inch thick plywood and the hardwood panel was 1/8 inch thick so I set the dado to cut a 7/8 inch thick groove.

Set your dado blades to that thickness and cut a 1/2 to 3/4 inch deep groove down the center of your 2x4s (long ways, the entire length of the 2x4).

DSC05863

Cut all your pieces to length. You can angle what will be the bottom ends of the 2x4s if you can figure out what that angle is. I guessed and it turned out alright. I'm sure it would look just fine not to angle them as well.

Squeeze a generous amount of adhesive into the groove on one of the 2x4s and slide the stacked plywood and hardwood panel into the groove.

The slide

Add shims in the groove on the back side if necessary to ensure it is nice and tight.

The Slide

Repeat with the other 2x4 on the other side of the plywood/hardwood stack.

Allow the adhesive to set over night for best results.

If you want the base of the slide to end above the floor by a few inches, the last step is to add a piece of 4x4 to the bottom. I used a scrap piece from when I ripped something out of the kitchen. I liked that it blended with our hardwood flooring. I got it in there at the right angle (more guessing I'm sorry to say) and added 2 screws in to each side before putting the slide in place.


The Bed to Beat All Beds

For more information on how the slide is supported and how to build out an Ikea Kura bed like this one, check back on the blog in a few days for full specs.

Thank you for reading,
Julie


I Love Chalkboard Paint

I really love chalkboard paint. I like to make sure I always have a can on hand. My latest chalkboard paint update landed on Claudia the Chifforobe.

If you'll recall, she started like this:

SONY DSC

Was turned into this for the nursery:

SONY DSC

But then I kept moving stuff around in the drawers and my husband is going nuts trying to find clothing for the little guy so I thought I'd pop out the panels in Claudia's door, paint the back side with chalkboard paint then put the panels back in backwards. Now when you open the door you see the decorative panel which has no real value except I know that when we get tired of the chalkboard panels, we can just flip them back around. So here she is:

DSC04773
(I think she looks handsome)

And with labels:

DSC04774

Someday we won't need to label the drawers and this can just be a fun area for doodles and notes or for little Tigger to practice writing.

Do you like chalkboard paint? What have you used it for? Feel free to leave a comment and even include a link if you've got pictures.

Thank you for reading,
Julie

Nursery Reveal

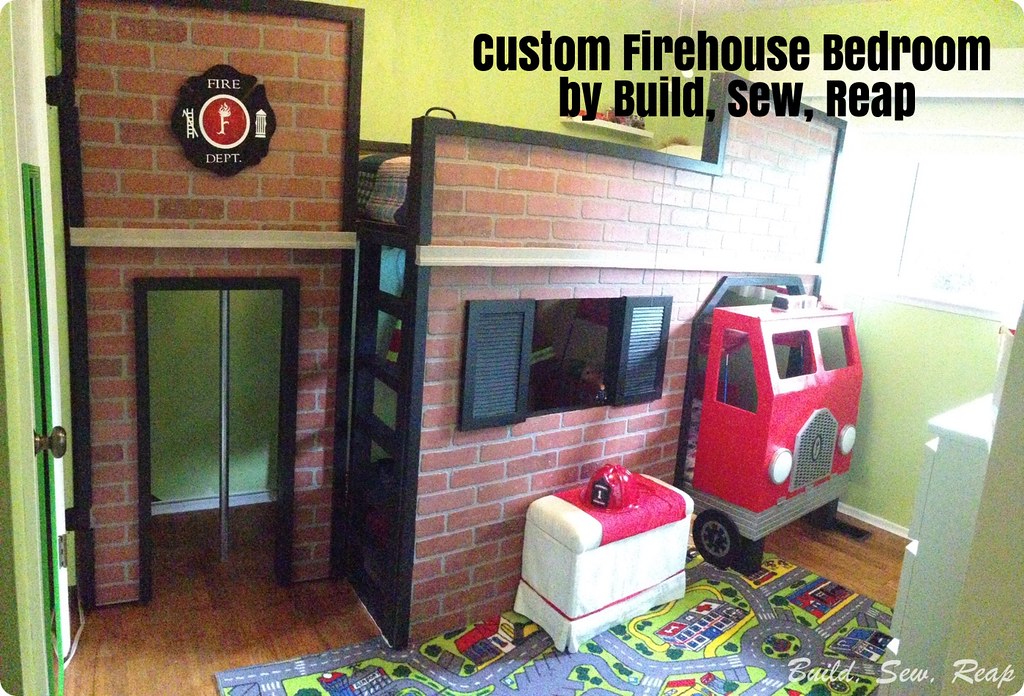
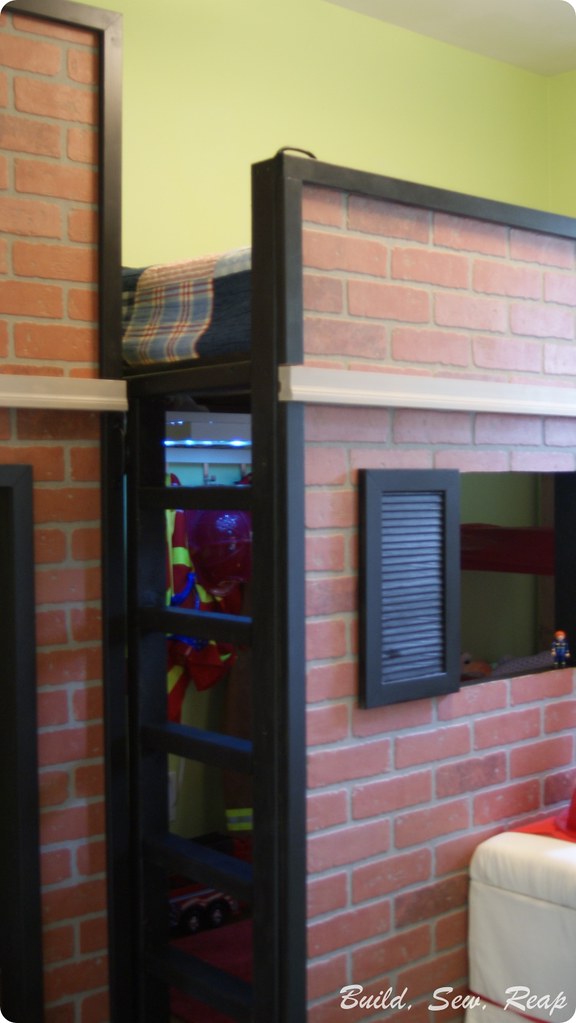
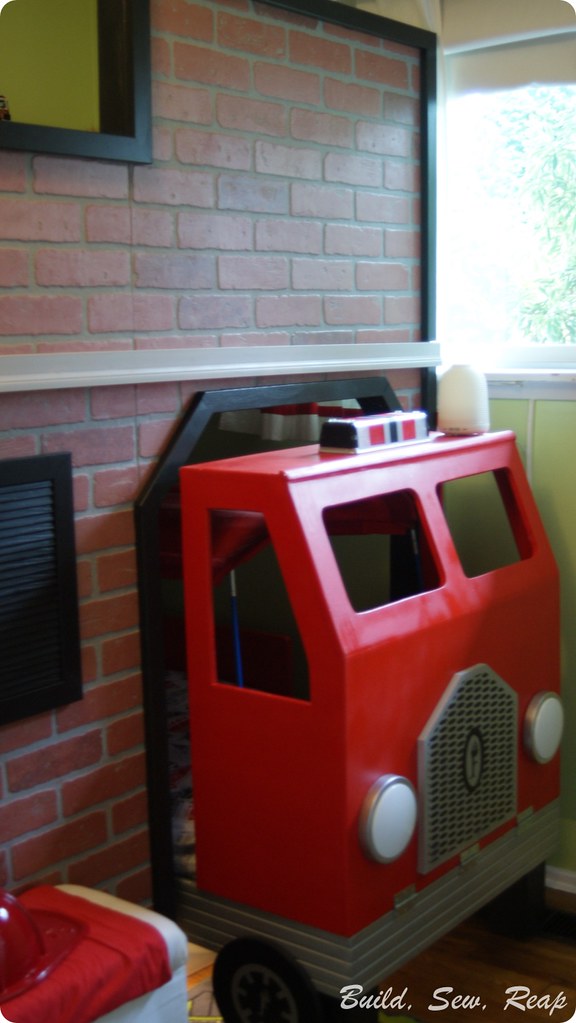
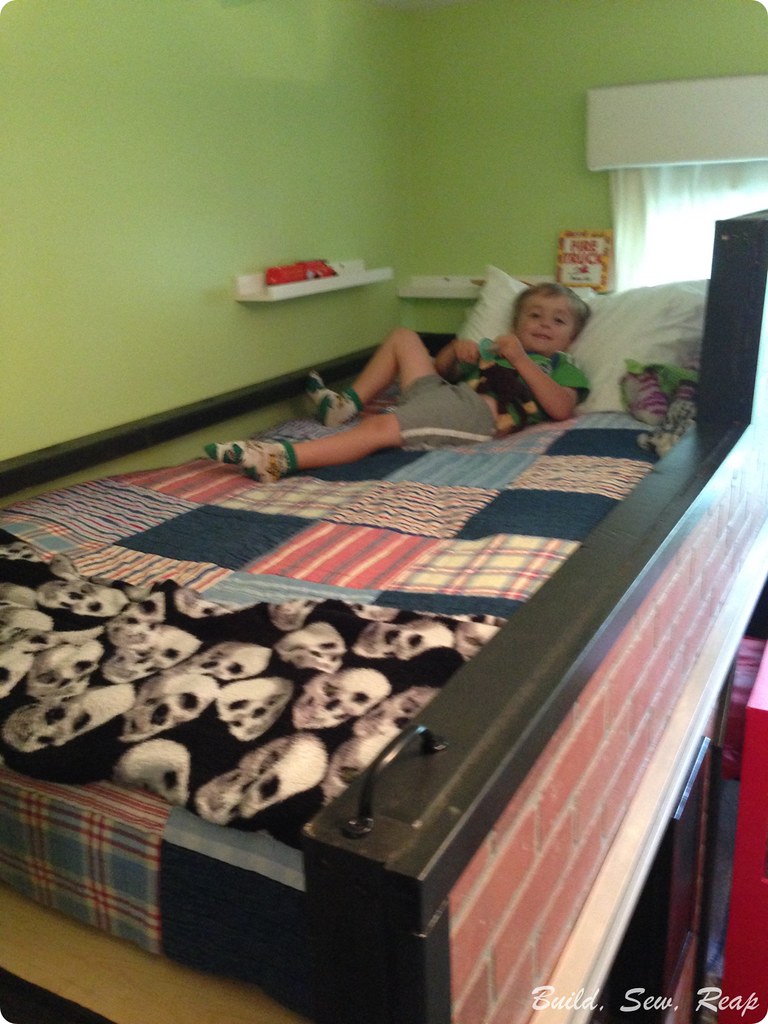
I've been showing you bits and pieces of the nursery for weeks now but it is finally totally finished!! After I got the last project completed, I just stood there in the middle of the room feeling strangely unburdened. I LOVED working on the nursery but sometimes having an ever expanding to do list in my head is overwhelming. I'm sure I'll add things to it here and there over the next few months but I'm thrilled to say that I completed all the main work during my 2nd trimester which was my overall goal.

So, without further ado, here it is:

DSC03065

The wall need an extraordinary amount of prep work but once that was finished, I rolled on 3+ coats of Olympic Paint's "Lettuce Alone" in their no VOC / low odor paint.

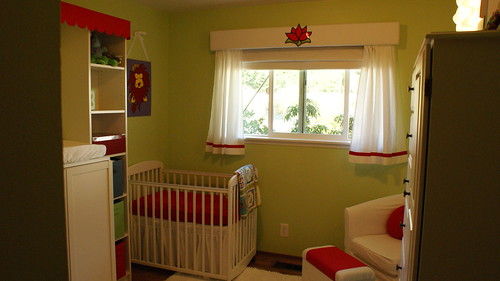
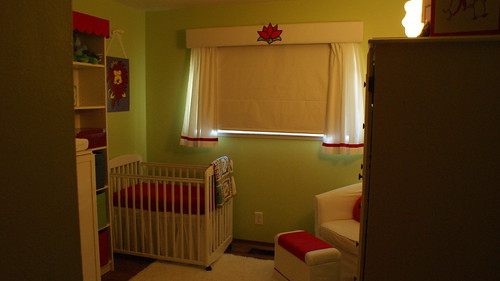
The crib is the DaVinci Alpha Mini Rocking Crib that I purchased off of Craigslist. I had to touch up the paint a little in places but Olympic Paint's "Delicate White" in semi-gloss matched perfectly. I made the fitted sheet out of "ultra cuddle" fabric and is a deep red to match the other reds in the room.
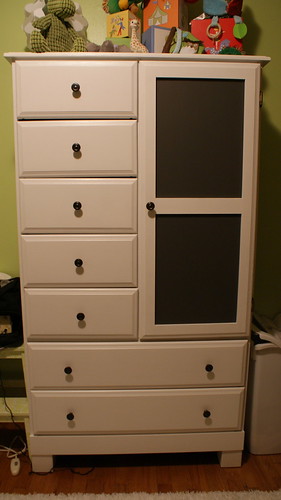
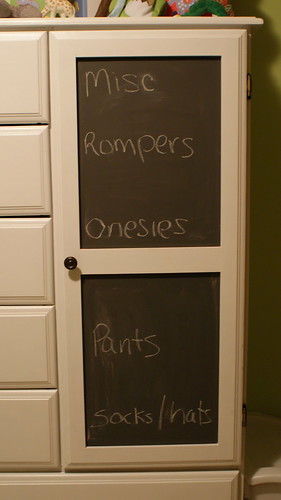
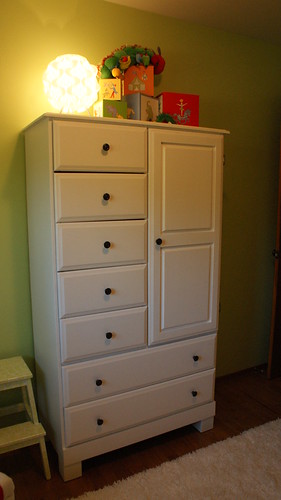
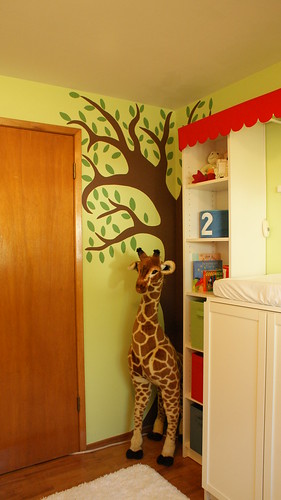
Here we have Claudia Chifforobe which was originally stained wood and in Snickerdoodle's nursery when he was an infant. It had a rough life though and needed to be restained or painted so I chose to paint it.

SONY DSC

This is another piece I used the Delicate White paint on. The light on top is the Fillsta lamp from Ikea attached to a Dimma switch also from Ikea so it can be set really low and used as a nightlight.

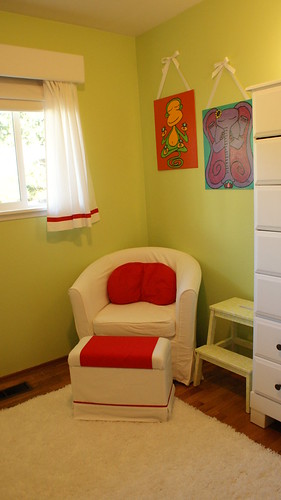
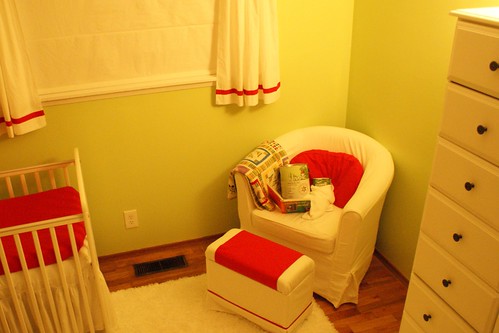
Just next to Claudia is the reading/feeding corner.

SONY DSC

The chair is the Ikea Tullsta but I purchased ours off of Craigslist and then got a new Ektorp cover in Blekinge white which I bleached to get it the stark white you see here. The foot stool was something I built one weekend using scrap wood and fabric from other projects. The top lifts off to reveal storage beneath.

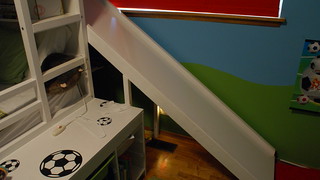
The step stool you see next to it was an Ikea Bekvam we had on hand that I painted. To me, step stools are infinitely more useful to have around than small tables (that can be pulled down on crawling babies' heads) so that's going to be the table for my drink and book for those late night feedings.

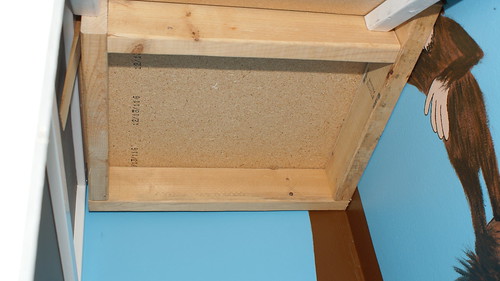
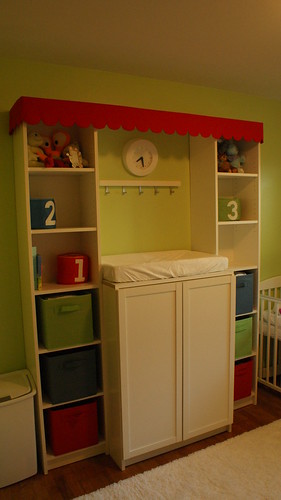
We also didn't want to purchase a new changing table but the one for Snickerdoodle's nursery was too big so we sold it and I put together a changing station using Ikea's Billy bookcases.

SONY DSC

For more on how I set this whole thing up, you can check out my Ikea Hack 1 and Ikea Hack 2 posts.

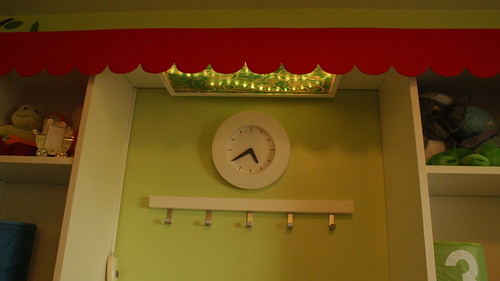
Up above the changing table is a cool light I created using a rope light, stuff from around the house and Snickerdoodle's mad finger painting skills.

DSC03066

I wanted something to provide just a little bit of light but that would also be interesting for the baby to look at during changes. This is also attached to a Dimma switch from Ikea so it can be turned down nice and low for sleepy nighttime changes.

Now, on to the window treatments:

DSC03070

Somehow I managed to miss blogging about the window treatments but here they are closed. The blackout Roman shade is something I made out of an old sheet, blackout fabric from JoAnn (on sale no less, hooray) and some random materials found in our garage to hold each section straight. The curtains are also parts of the sheet with some red bias tape stitched down to the bottom edge. Having curtains AND a shade give us options on how much light and fresh air to let in. Finally, the cornice across the top is one I made out of scrap wood, foam and more sheet remnants. The lotus flower is just printed on photo paper and is significant because the artwork my awesome cousin did also contains lotus flowers.

And now, the artwork:

SONY DSC SONY DSC SONY DSC

This stunning artwork was created by my cousin Camille of Mille.me (also on Facebook). She posted pictures of these paintings several months ago and I knew right away they would set the stage for the entire nursery (which I was still only dreaming about). I can't express enough how much I truly truly love these wonderful paintings she calls Buddhamals. Thank you Camille!!

The last few touches I added to the room included Daisy the giraffe (free through a friend, yippee) and a hand painted wall mural:

SONY DSC

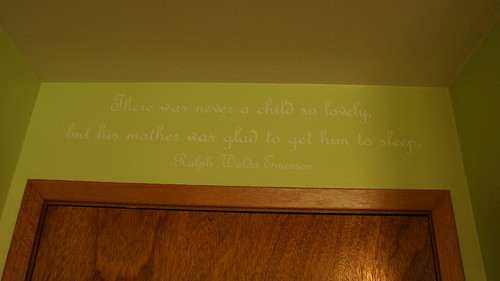
And finally, the last thing you see as you leave the room - a quote by Ralph Waldo Emerson above the door:

DSC03064
"There was never a child so lovely,
but his mother was glad to get him to sleep."

Now I just need one more thing for the nursery but he won't be here until around December 22. I'm glad the room is finished though, one less thing to worry about as my belly grows and grows and grows!

UPDATE: I entered the Olympic Paint and Stain's Simply Done contest and wanted to include my entry photo on this blog post. The criteria was that a can of Olympic paint had to be in the photo (oh, and of course, that I used Olympic paint which was already done) so I set up "Mama paint" reading Goodnight Moon to "baby paint" on the reading chair.

Simply Done

Thank you for reading,
Julie

Ikea Hackers shared my build! Check it out here.

I'm sharing on:

HGTV's Rate My Space - come on by and put in your vote!

A Marvelous Mess
Mondays @ All Things Fee!


Related Posts Plugin for WordPress, Blogger...