Showing posts with label Birthdays. Show all posts

Vegan Chocolate Cake with Vegan Buttercream Frosting

It wasn't the case when I first started blogging but I'm vegan now and I also found out that cane sugar gives me headaches. Between those two issues, it's not super easy to buy cake that fits my dietary restrictions so I've learned to just make my own. With lots of scouring the internet and tweaking other recipes to suit my needs, I've come up with the very best ever no cane sugar vegan chocolate cake with buttercream frosting. This stuff is TO DIE FOR!

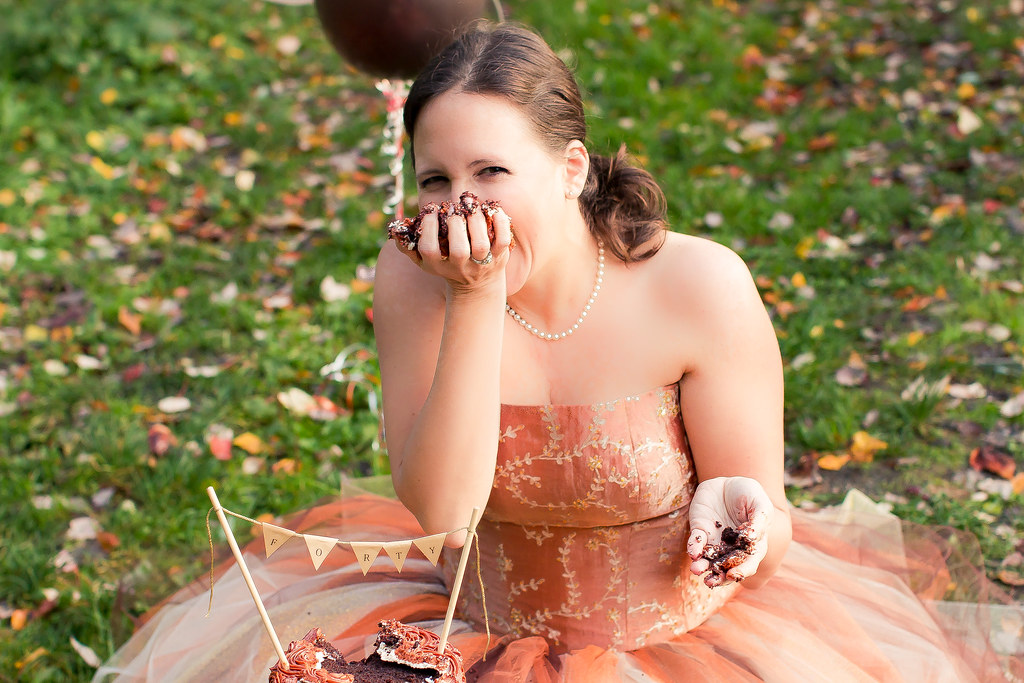
First, a picture of my 40th birthday cake:
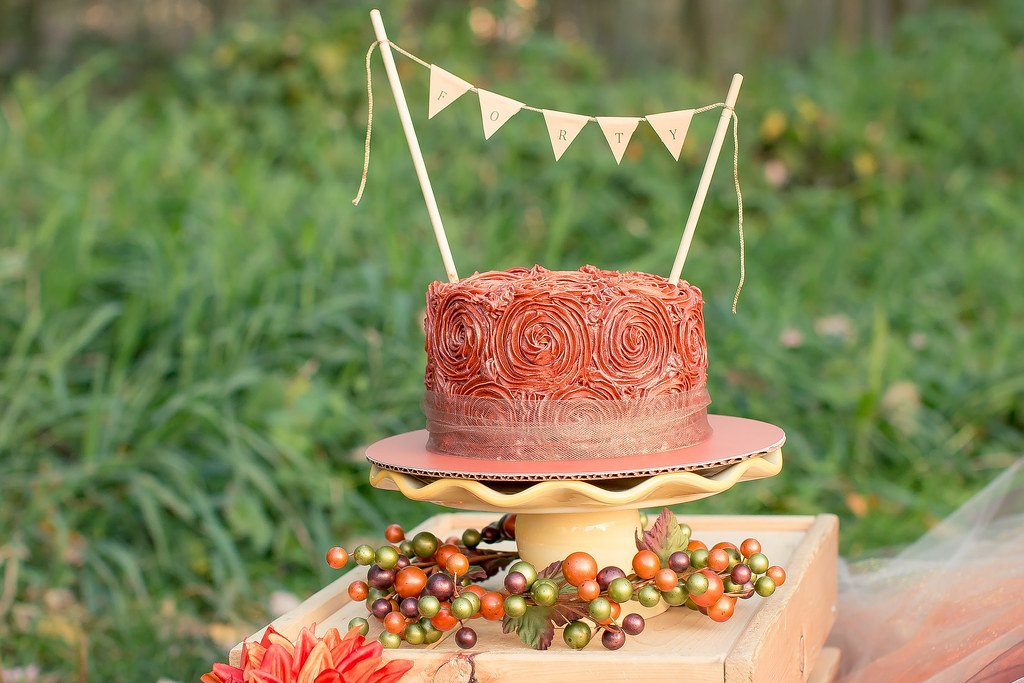
IMG_2950

I made this cake for my 40th birthday cake smash photo shoot. We had a ton of fun. But today I'm here to share the recipe with you (also so I'll have the recipe for my own future use).

Chocolate cake 

2 cups almond milk 
2 teaspoon apple cider vinegar
1 1/2 cups coconut sugar
2/3 cup avocado oil (you could sub any neutral oil but this is what works for me)
2 teaspoon vanilla extract
1 teaspoon almond extract ok to just do all vanilla if you don't have almond extract)
2 cups all-purpose flour
2/3 cup cocoa powder, Dutch-processed or regular (or a mix of both)
1 1/2 teaspoon baking soda
1 teaspoon baking powder
1/2 teaspoon sea salt

Preheat oven to 350F.

Mix together the almond milk and vinegar in a measuring cup and set aside for a few minutes to curdle. Add the sugar, oil, vanilla and almond extract to your mixer bowl and mix well. Add the almond milk/vinegar mix and whisk well. 

Add in the flour, cocoa powder, baking soda, baking powder, and salt and beat until mostly smooth. 

Line the bottom of two 9-inch cake pans with parchment paper and lightly grease the paper it as well as the sides of the pans. Divide the batter into the two pans and bake for 32-35 minutes, until a toothpick inserted in the center comes out clean. 

Vegan Buttercream Frosting
NOTE: This frosting does NOT come out white. You will need to color it with gel food colors if you want something other than tan. 

This frosting holds its shape really well even before it has been refrigerated. I made it and had to leave it sitting on the counter for 45 minutes before I piped it onto the cake. Also, the picture of the cake above shows what it looked like after sitting in the refrigerator for a week. It did a good job of keeping the cake pretty moist and the frosting looked and tasted great. This wasn't the plan but my son got sick on the day of the photo shoot so we had to postpone the event.

Make powdered coconut sugar in the dry goods canister of the vitamix or a good food processor. 3 1/2 cups coconut sugar : 3 1/2 Tbsp arrowroot powder (precision on the arrowroot powder isn't imperative, just get close)

1/2 cup room temperature earth balance shortening
1/2 cup room temperature earth balance buttery spread (in the stick)
3 1/2 cups powdered coconut sugar
1 1/2 tsp almond extract

1/4 cup almond milk 
Gel food coloring if you want something other than tan colored frosting. I used burgundy to achieve the color for this cake

Using the paddle attachment for your mixer, beat the shortening and buttery spread until it's combined. Add the rest of the ingredients being aware that a puff of powdered sugar is going to attack your kitchen. I used what I think is the dust attachment for my Kitchenaid mixer (it's a clear plastic thing you can pour stuff through) with a clean kitchen towel laid over the whole thing as soon as I've added the sugar. It's a bit messy but it blends in pretty quickly. Add the food coloring and mix until everything is well blended.

This is thick enough to hold its shape if you want to use a tip and a frosting bag. It's rich and delicious too. Yum!

Thank you for reading,
Julie


40th Birthday Cake Smash

Well, today is my birthday. I'm pretty excited about turning 40. In my experience, life keeps getting better. As I grow and learn and continuously work on being the woman I want to be and I surround myself with the people I love most, I find I can look around and be thankful for what I've created. I have an amazing support system of family and friends who lift me up and encourage me every step I take. I'm truly a very lucky girl.

To celebrate my birthday, I asked a photographer friend to do a special photo shoot with me. I'm clearly an avid Pinterest surfer and love all the cake smash photos others do of their 1 year olds so I thought it was high time I got to do my own. So without further delay, I present to you:

The 40th Birthday Cake Smash!
Photography by Verb Photography by Angie Langford


Cake Smash Collage 1


IMG_2950

IMG_2977

IMG_2980-2

IMG_3006-2

IMG_3009-2


Thank you for reading,
Julie


Star Wars Lego 6th Birthday Party

Well, it's that time of year again. My big kid just had his birthday and although I tried *really* hard to tone it down a bit, I think I failed. We did manage to keep the guest list to a reasonably sized group of kids his own age and family but we still went a little nuts with decorations. I'll take you through it from start to finish and hope that it inspires you to take on some fun Star Wars Lego projects of your own.

The invitation:
If you've looked at ideas around Pinterest at all, you've probably seen this type of invitation. It wasn't an original idea but I gave it a few of my own touches.

Star Wars Lego Party by Build Sew Reap 21
(identifying information is blacked out for the blog)

Since I don't have fancy-pants photo editing software, I found it was easiest to type the text in MS Word then use word art to stretch and skew it to give it the look that it was flying away through space.

As our guests approached the house, the first thing they saw was that there were giant Legos on the roof.

Star Wars Lego Party by Build Sew Reap 07

I used scrap wood (mostly 2x4s) and a sliced up wood dowel to create the Lego look.

Star Wars Lego Party by Build Sew Reap 20

Each kiddo was handed a pool-noodle lightsaber and they immediately jumped into an epic battle. I think those kids beat one another for at least 30 minutes.

Star Wars Lego Party by Build Sew Reap 06

This little Padawan was a little more hesitant to jump into battle.

Star Wars Lego Party by Build Sew Reap 05

Once they worked out their aggression, we handed out bubble wands.

Star Wars Lego Party by Build Sew Reap 19

I bought bubble wands and spray painted the handles with cheap $.99 spray paint from Home Depot. It worked out great. If I had it to do over again though, I might have shoved a few glow sticks in each one.

Inside the house, there were around 75 giant legos made by wrapping boxes in black, silver, yellow, and red wrapping paper then spray painting using a stencil (and some previously undiscovered graffiti skills) to make them look like big legos. I thought about doing an activity with them but decided against it at the last minute.

Star Wars Lego Party by Build Sew Reap 02

I made a bunting using half sheets of brightly colored copy paper and letters that I printed out on my computer then cut out by hand. I used a Lego font I downloaded for free online (please forgive me, I have no idea where I found it).

Star Wars Lego Party by Build Sew Reap 04

I made candy-coated pretzel rod Lightsabers and graham cracker, vegan marshmallow, and candy melts (to stick the marshmallows to the graham crackers) Tie Fighters. All food also featured labels held up by Lego Duplos.

Star Wars Lego Party by Build Sew Reap 10

At the birthday boy's suggestion, he built a chip bowl out of Duplos as well.

Star Wars Lego Party by Build Sew Reap 11

My mom put together this crafty little silverware holder and my dad drew Lego man faces onto yellow Dollar Tree paper plates which were also supported by a structure my mom built.

Star Wars Lego Party by Build Sew Reap 12

As I do every year, I created an elaborate cake. Yes, it's far more elaborate than needed for a 6 year old's birthday and featured way more cake than was necessary but I don't have a lot of opportunities to create cakes so I just go all out and over the top when the occasion arrises.

Star Wars Lego Party by Build Sew Reap 17

The top layer was a cane-sugar free vegan chocolate cake made from scratch. The middle layer was a gluten free cake made from a mix and the big layer on the bottom was a vegan yellow cake that, quite frankly, didn't turn out so great. The kids didn't mind though.

I was lucky enough to capture a picture of the birthday boy's face when he saw the cake for the first time:

Star Wars Lego Party by Build Sew Reap 01

And here are the guest singing the Happy Birthday song to my kiddo:

Star Wars Lego Party by Build Sew Reap 18

He loved his party more than I could have hoped for. My husband designed and lead the kiddos on a Jedi training obstacle course in the back yard, we had a piƱata full of legos, there was an area for free-building with a HUGE tub of Legos to pull from and lots of happy kids running all around.

In closing, I just have one thing to say:

Fierce Jedi 1

May the Force be with you!


Thank you for reading,
Julie


Superhero Party Cake

After pinning and dreaming and giving myself lots of pep talks, I attempted what seemed like the impossible (to me). My biggest problem with cakes is that I can't start them a couple of weeks in advance and have plenty of time to redo stuff I don't like. With cake - it's all or nothing. I wait until two nights before the party to bake the cakes so they're cooled the day before which makes decorating infinitely easier.

DSC04658

The bottom cake was a 2-layer yellow cake as was requested by the birthday boy. The middle cake was a 2-layer homemade vegan chocolate cake (for me mostly but hey, I made it, I needed to be able to enjoy some of it right?). The top cake was a 2-layer Bob's Red Mill gluten free yellow cake mix. The Snickerdoodle had no idea what I had up my sleeve so after staying up late into the night the night before his party, I was eager to show it to him first thing the next morning. When he saw it, he said just what I needed to hear, "Wow Mommy! That's exactly the cake I wanted you to make me!"

He loved it, as did all his little superhero friends.

DSC04720

Thank you for reading,
Julie

Curious about the rest of the superhero themed party? Check out
Superhero Party Invitations
Superhero Party Decorations
Superhero Party Capes


Superhero Party Capes

I thought the next post would be about the cake but I wanted to sneak this one in first. The cake post should go up on Saturday.

I made a t-shirt cape for each kiddo who attended the Snickerdoodle's superhero party. I tried to figure out what each one would like best and make something personalized. I'll include a tutorial below but here are the 21 capes hanging on a clothesline down our hallway inside the house:

DSC04641

I hit the $1 rack of t-shirts at Goodwill and picked the brightest t-shirts they had in size adult medium. I even bought some of the ones with the ugliest possible front graphics figuring nobody else would ever buy them. The only criteria I had was that the backs be completely plain and that there were no side seams. Once I cut them all out (over several evenings), I began using my Silhouette to cut out freezer paper to fun designs and painted each cape with a different design. For the party, I printed out address label stickers with each child's first name to stick to the capes so we'd know who should get which cape.

DSC04640

DSC04635

So now on to the tutorial. There are lots of tutorials out there but after reading several, here's the process I found was quickest, easiest and produced the best results.

First, lay the t-shirt out flat with the front side up. Cut off the arms. It doesn't really matter which side of the seam you cut on but I found I was able to match up the sides better in the next step if I cut on the sleeve side of the seam.

DSC04390

Next, fold the shirt so that the front of the neck line is folded in half together. Don't fold the whole t-shirt in half, you more need to just grab the very center of the front neckline and fold so then the very center of the back neckline is not folded within it but folded out away from the front.

Start your cut at the front center and snip just below the neck ribbing for a couple of inches then angle out so that you cut to the shoulder seam about 2 1/2 inches from the neck hole. At that point, snip to the arm hole next to the shoulder seam.

DSC04391

It should now be easier to flatten out your whole project so that the front is folded in half on one side and the back is folded in half towards you. Clip from your last cut all the way to the bottom edge of the shirt while angling out towards the front.

DSC04392

The back of the shirt now serves as a fantastic cape with the original neck binding of the t-shirt being the neck of the cape. Decorate and give to your favorite superhero!

Thank you for reading,
Julie


Superhero Party Decorations

I set out to find a material I could cut easily and that came in sheets bigger than readily available foam core board (which is actually available at Dollar Tree in case you don't need something bigger - $1 is a great price!!). I ended up at Home Depot because I'm pretty sure they have everything I could ever need when I don't know what it is. While pricing out plywood, I came across hardboard which ended up being exactly what I needed.

Screen Shot 2013-04-09 at 8.20.15 AM

It is easy to cut with a jigsaw, holds paint well and is just sturdy enough to make all sorts of stuff out of it. I made a bunch of signs, flames and an explosion. The hubs mounted them to the house using special nails made for panelboard. I recommend these because they hold on to the thin wood really well. I tried using the nail gun for part of the project but they all pulled through the hardboard.

DSC04663

The bat signal had to be front and center since the Snicerdoodle was dressed up as Batman for the party. I cut out flame shapes for above the garage and two of the front windows, there's an explosion on the chimney and then you can see the various comic bubbles throughout.

And stepping back, here are some pictures of the rest of the house.

DSC04665


DSC04619

The hubs picked up some caution tape that he strung throughout the property. Originally we were just going to use a little along the back of our property so the kiddos wouldn't wander into the neighbor's yard but the roll was so big, he just kept going with it. It definitely gave the house a look of chaos, as if the villains really had attacked. It was so fun!

We also picked up a gigantic inflatable Spiderman on Amazon and inflated it ourselves using the air compressor. We didn't want him to be helium. He looked great on the garden side of the gate I just made (going to have to post about that too). It mostly kept the kiddos out of our garden which was what we were aiming for.

DSC04667

I think he even scared a few people (insert evil laugh).

Moving inside. I bought about 800 yards of black and grey felts and made a cool backdrop to hang on the wall behind the food table. Here it is partially assembled:

DSC04497

This was pretty easy to put together. I figured out how big to cut the background then just started with black buildings, moved on to dark grey, then light grey then did a mix at the front. I was really happy with the end product.

I also added a bat signal before it went up on the wall. The signal is also felt but the light beam is organza that I painted with Mod Podge before cutting it out. I just laid it on some freezer paper and coated it well, let it dry then cut the triangle to serve as the light beam.

DSC04674

At the Snickerdoodle's suggestion, we used our Halloween bats throughout the living and dining rooms to decorate the walls. We also had some helium balloons and streamers.

I thought the place looked great and the kiddos really seemed to enjoy the superhero theme. Up next - the cake!!

Thank you for reading,
Julie


Superhero Party Invitations

We just celebrated the Snickerdoodle's 5th birthday this past Saturday. We love going up and over the top with the themes he picks and this year he wanted to do a superhero party. We knew that would be loads of fun so we approved his request and ran with it.

I looked around online for a website that would allow me to create my own comic for the invitations. I ended up using Pixton. I found their site was easy to use and had enough flexibility for me to make what I wanted to. Here's the final product:

Pixton_Comic_Obi_by_rain25girl-3

I uploaded the file to cardstore.com (my favorite place to order cards) and set some to be sent straight to our friends and a stack of others for us to hand out to those we see regularly in person. The ones that were sent out by cardstore were sent as postcards which I thought was fun. For the ones we handed out ourselves, I put each one in a brightly colored envelope:

DSC04409

The invitations were a huge hit and they set the stage for the super fun party on Saturday. Next post - Superhero party decorations!

Thank you for reading,
Julie


Mustache Party

We had so much fun celebrating the baby's first birthday with a mustache themed party. It was exactly a month ago so it's high time I get this post written and published! 

The crepe paper - I saw this post by Made awhile back and fell in love with the look. It was super simple to make (although admittedly it used a whole lot of thread) and the end result was fantastic.


DSC02784

DSC02699


The cake - I picked up the mustache mold from Archie McPhees (although I saw it other places too) then created the hat and lettering out of fondant. I purchased the black fondant instead of making it myself and boy was that a worthwhile times saver!!

DSC02599
(of course, where you see a big messy blob at the top right, the real version had his name)

The random mustaches: I used my Silhouette to cut out a bunch of mustaches out of black vinyl and stuck them to just about everything including the bathroom mirror. There were several of them at different heights so guests could align their reflection with them to try them on.

DSC02706

The Cocoa Bar - I posted about this part before. I put out cocoa and fixin's. It seemed so fitting for a cold December day. I also made chocolate and yellow candy mustache-on-a-sticks. I didn't get a good picture of them though and, well, they're loooonnnggg gone now. You can see them a little bit on the back corner of the cocoa bar in this picture.

DSC02602

I used lots of burlap in the decorations including for the bunting, table cloths on both the cocoa bar as well as on the buffet table, around jars to hold plasticware and pretty much anywhere else I could find reason to stick it. I really enjoyed working with it and hope to get a post up with some tips on successfully decorating with it.

The Jars - I originally decorated these for us to drink cocoa from but then ended up using them to hold plasticware and other party necessities.

DSC02543

The Food - we had three homemade soups, bread (not yet on the table when this pic was taken), veggies and fruit. Yum!!

DSC02604

Oh, and of course, the bouncy house was set up out back. Boy was that every a great purchase!! We bought that for the Snickerdoodle's 2nd birthday party and use it several times each year including birthday parties, play dates and random days when I feel like moving furniture in the living room to set it up for indoor chaos.

The Look: Mustaches and hats required.

230361_10151235403594442_1468574281_n

DSC02556

DSC02608

The Front of The House: Yep, an 8 foot mustache.

414128_10151229853999442_1099906919_o
(Confession #1: The Christmas lights weren't up for his party but then, the party was also during the day. I just liked the picture of the house with the mustache AND the Christmas lights. Confession #2: The mustache is still up there and we don't have any immediate plans to take it down)

The party was really fun. We could only really invite family to celebrate with us because it was too cold to have any of the party outside and our home is pretty cozy. I think we might have to have another party this summer ... must start thinking of a theme.

DSC02704

Thank you for reading,
Julie

PS Happy First Birthday Sugar Pop!!

337273_10151227625634442_768504066_o


Related Posts Plugin for WordPress, Blogger...