Showing posts with label Papercrafts. Show all posts

1 Minute DIY Layered Nursing Top

This will be the easiest tutorial I'll ever post. I'm excited to share my findings with you though so read on.

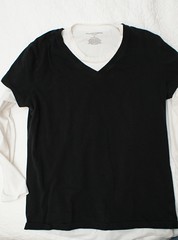
Nursing on the go is never all that easy but with the right tops and a good nursing cover, it doesn't have to become a peep show for those around you. The problem is, those nursing tops can be expensive and aren't always all that attractive or subtle. I like to layer my clothing which means this combination with jeans is one of my favorites:

DSC04445

I tried wearing that outfit once recently and was really uncomfortable when I tried to nurse the little one not to mention I couldn't have nursed with any semblance of privacy since I had to pull both shirts up.

Here's the solution I came up with:

What you'll need -
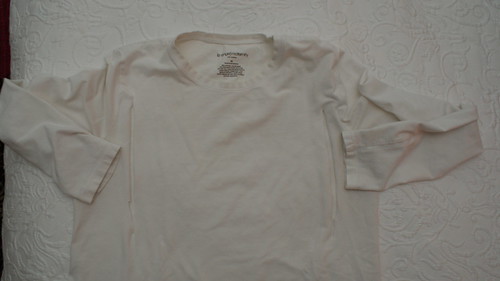
  • 1 long-sleeved shirt (this is actually a white maternity shirt that I wore before I got huge)
  • Scissors
  • Optional: Sewing machine
If you're using an old maternity shirt that is bell shaped and you want to fix that, just stitch down the side seams to take it in a bit. I didn't have to, my shirt was just longer, not wider, than a regular shirt.

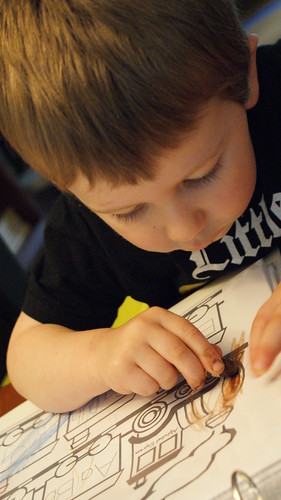
Now try on the shirt, look at where your bust is, mark it if you want (or just eyeball it like I did).

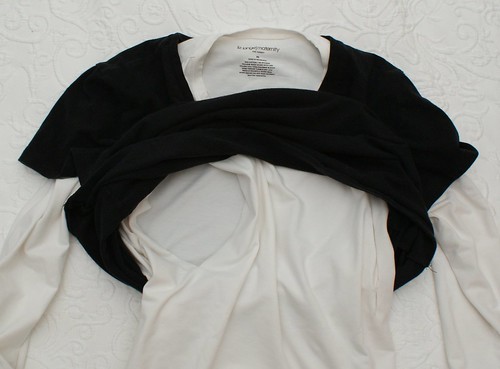
Take the shirt off and cut two vertical slits as you see here:

DSC04444

To be honest, my slits start a tad high, I didn't eyeball the placement very well. Each cut is about 7 inches long and you'll notice they don't run straight down the center of each breast, they're actually off to the side of each, just a couple of inches in from the sleeve seam. Placing them there means you don't see wrinkles through my outer shirt.

When it comes time to nurse, here's how it's done:

DSC04447

The t-shirt material won't fray so you don't have to finish the edges or anything. It is easy as can be and when you need to nurse, the shirt stays down covering your middle. With this setup, I don't feel at all exposed when I'm nursing. It isn't any secret what I'm doing but I remain well covered.

Thank you for reading,
Julie

Scrabble Tile Pendants

I need another craft addiction like a hole in the head which is why I was a little wary when I received an invitation from Marie of Make & Takes to join 20+ other crafters for a Night of witchCRAFT. I was right to be afraid but I really wanted to get out and meet some local creative types so I signed up. I guess I should consider myself fortunate that out of the handful of fantastic Halloween creations I made, I only really walked away obsessing over one of them . . . the Scrabble tile pendants:


Photo courtesy of http://www.makeandtakes.com

They are so simple to make but open the door to such creativity. I made my 2 (not pictured here, it seems a certain 3 1/2 year old ran off with mine) then went home trying to figure out how I could justify making a whole bunch more. Then it hit me that one of my nieces would probably love to have a set of them for Christmas.

I'm not going to post my own tutorial because I think the one at Make & Takes is terrific. I will, however, help you find the materials:


  • Paper - I didn't purchase any paper, I just dipped into my scraps for some and even printed a bunch of images that I resized to tile-size. More info on this below.
  • Scrabble tiles - ask around, you probably know someone with some to spare
  • File - I used a nail file
  • Mod Podge - At your local craft store (JoAnn, Hobby Lobby, Michael's)
  • Diamond Glaze - I found mine at JoAnn. 
  • Aanraku Jewelry Bails - I ordered mine from this Etsy shop based on Marie's suggestion. I ordered medium sized ones, not small.

I think the most valuable thing I can add to this project is where to find great designs for the tiles. First of all, search through magazines and catalogs. I cut out lots of neat images containing different patterns and textures from Oriental Trading Company, Pottery Barn Kids and a handful of other catalogs that had recently arrived.

DSC03666

Here are some of the tiles I created using these magazine cutouts and some paper I had on hand:

First Bunch

I also did searchs for images using Google images. I was looking for different season and holiday images so I used search terms like "Valentine's Day Scrapbook Pages." I loved finding photos or scans of scrapbook pages that didn't contain someone else's photographs. Now, I wouldn't sell those but this was for a gift so I didn't hesitate to borrow the designs. Once you download the photos, import them into MS Word and resize to Scrabble tile dimensions. I created a table with set cell size and imported each photo into a cell:

Full Set

I printed out my table on my home printer and cut them out.

DSC03671

Here's the whole set of tiles that I decorated (I got a little carried away):

All Tiles

I ran out of bails but knowing I'll probably order more eventually, I went ahead and created the tiles anyway.

I picked some of my favorites, made a little purple fleece bag and will send them as a gift to my niece.

DSC03695     DSC03698

I'll never look at a scrap of paper the same way again. 

Thank you for reading,
Julie

I'm sharing on:

Fire Starters

It's fire (in the fireplace) season and being a bit of a frugalista, I'm always looking for ways to save money on our addiction. I saw this great idea while out surfing the web and wanted to share with you and walk you through how easy it is to make them. These are fire starters that I found on marthstewart.com.


They're super easy to make! We already get the Sunday paper and recycle most of it by the end of the day so now I have a little hands-on project I can do over my morning coffee.

Here's how to make your own:

Grab a page of the newspaper (I used one large folded page so really 2 pages I guess) and crumple it down making one long stick.

DSC03436

Start twisting and hold it tight, grab an assistant if you need some help. Twist it really really tight.

DSC03441
(my child is so burdened by my requests)

Fold it in half and hold the ends together in one hand . . .

DSC03443

... then grab the top with the other hand and you should find that the whole thing naturally wants to twist together, you shouldn't have to force it at all. If you find it doesn't want to, first try the other way, then straighten it out and begin again, this time twisting it much tighter.

Tie a length of twine or string around the end. It doesn't have to be super tight.

DSC03445

Admire your work.

DSC03446

Make a bunch more.

DSC03447

Now load them into a pretty bowl or basket.

SONY DSC

Oh, and don't forget to wash your hands before you go back to relaxing on the couch.

SONY DSC

When you want to use them to light a fire, we found it works best to load them in at the bottom (where kindling would go) and to light the open end - the one with the twine on it. I twisted mine so tight that they burn very slowly. I have no trouble getting a full fire lit on just 2 or 3 of these. That's pretty great since I'm more used to using an entire section of the paper wadded up into paper balls. Please remember that using newspaper in your fireplace does release some additional chemicals into your chimney which can build up so a good cleaning every once in awhile is in order.

Thank you for reading,
Julie

Bat Invasion

I knew as soon as I saw a Pin of a bat invasion on pinterest that I'd be using my Silhouette to create my own flock of bats. Of course, in true Julie fashion, I couldn't stop at one wall though, I had to create some sort of hellish bat explosion all over our living and dining rooms (which make up one big space). My husband loves them and once Snickerdoodle got over that I wanted him to play by himself a bit this morning so I could decorate, he too decided they were pretty fun.

I used a Silhouette bat pattern but I did add a dashed line down the center so they'd fold easily. Then I added a roll of tape to each of 160 bats ...

DSC03398

and I got to work sticking them in what I believed was a realistic bat formation.

DSC03410

I stuck a few on, then some more and some more and some more. Then I grabbed my favorite little model and took some pictures.

DSC03409
(he's pretending to be angelic or something)

DSC03412
(strike a pose kid!)

Snickerdoodle and I also made a little centerpiece for the dining room table (using a wood kit from JoAnns and some water colors):

DSC03421

And I busted out some decorations from last year as well:

DSC03418

I've gotta say though - my favorite time to look at Halloween decorations is at night and my bats didn't disappoint me one bit:

DSC03424

DSC03426

Thank you for reading,
Julie

PS Watch out kitty!

DSC03405

I'm sharing this post at the following link parties:

Skip To My Lou

T-Shirt Yarn Halloween Wreath

We've lived in our house for 2 1/2 years now and the only time I've bothered to hang a wreath was for Christmas so I wanted to add a Halloween one to our decorations box this year. I set out to create it using materials on hand so this is what I came up with:

DSC03402

I had tucked last year's live Christmas wreath in the back of our carport thinking I'd take it apart and, well, I guess taking 9 months to do that isn't awful, right? Anyway, I took it apart to find this metal wreath inside:

SONY DSC

I then pulled out my ball of purple t-shirt yarn and cut it to about 6 inch lengths . . . many many many pieces. I also created some black as well as some white t-shirt yarn. I started out by tying one small strip on to the outside ring:

SONY DSC

and continued to tie one after another after another after another ...

DSC03136

until I had tied pieces on all around both rings

SONY DSC

Then I set the project aside until inspiration hit while at the grocery store. My store carries lots of non-grocery items as well and all their Halloween stuff is already marked down so I picked up a pack of glittery spiders. I used the same twist-ties that held them onto their packaging to hold them onto my wreath. Finally, I found a "Happy Halloween" I liked in the Silhouette store and created that in orange.

DSC03402

I'm happy with how my $2.99 (for the spiders) wreath turned out and as always, glad to have destashed a little in the process.

DSC03416

Thank you for reading,
Julie

I'm sharing this post on:
     Mondays @ All Things Fee!    Skip To My Lou

The Quiet Book for O

Recently I read a guest post by iCandy Handmade over on I Am Momma about these great dry erase quiet books. I thought the idea was great for so many reasons but the biggest one is that little O loves to make about 4 marks on a page with just one color crayon then call it done. I try to recycle the pages back around for him to color on again another day but he rarely does so I use the pages for scrap paper. At any rate, I thought these quiet books were great since the pages were reusable.

They suggest you use the new Crayola dry erase crayons or markers but I found that the washable crayons come off the page with a paper towel (and firm pressure) and the regular ones come off with a little Goo-gone which is one of my most favorite things EVER. It's like the miracle cleaner that undoes almost everything O has ever done (and has cleaned up a few of my own messes too). So, I won't be running out to buy a new set of crayons for this project.

The cover took awhile because I wanted to do something cute and fun but the rest of the book took about 15 minutes to throw together. I'll show you a few pictures then walk you through the SUPER SIMPLE steps to make your own custom quiet book.

Here's the cover. I used my Silhouette SD to make it bright and colorful. I slid this into the cover of a presentation binder.

Cover

And here are a few sample pages that I tucked into sheet protectors inside:

SONY DSC

Train 2 coloring page       Airplane coloring page


Here's what you'll need:


  • 1 Binder
  • Sheet protectors - the heavy ones are best
  • Coloring & activity pages (google coloring pages for any topic your little one is interested in to get printables)
  • Crayons or dry erase markers

Print out coloring and activity pages you think your little one will be interested in. Place a sheet of heavy paper (I used some photo paper that my printer hates) in between two of the print-outs and slide all three sheets into the sheet protector. I found that the heavy paper in between added just the right stability. Alternatively, you could print your activity pages on heavier paper.

DSC01302

It's ready! Give the book to your little one when you need a little quiet time. 

To clean the pages, depending on what kind of crayons you used, either wipe them with a dry paper towel or use a little Goo-gone or other miracle degreasing cleaner of your choice.

You  might have noticed the custom coloring photo of my son. I did that in Picnik by first converting my picture to black and white, then infrared then I used the pencil drawing tool and saved it.

Here's my little guy coloring in a train page with letter practice (pay no mind to the dirty fingers, we had a fun day playing out in the garden before the rain rolled in).

SONY DSC

Enjoy the silence!

Thank you for reading,
Julie
Other posts you might be interested in:
Make your own crayons
Pretty Clothespins
Gifts from the craft drawer

This post was shared on the Make & Takes Spotlight
Make and Takes

Pop Up Invitations

O's 3rd birthday is fast approaching and we're planning a big space themed party. I haven't been posting a lot lately because most of my creative energy has been poured into preparations for the party and I don't want to blow the surprise for those who will be attending. Since the invitations have gone out, I decided I could post about them including a little tutorial on making a pop up card of your very own.

First, a gallery of photos of the end product, then the tutorial on making your own pop up card. Please excuse the inconsistencies in the photo colors, I'm still using a back-up camera and am not having a lot of luck with it.

O picked out silver envelopes, he was certain that was the right choice.

DSCN4622


DSCN4629
It's hard to tell in this picture but the shuttle was mounted on double-sided foam tape so it stands out from the card a little bit. The stars were dotted on using silver paint pen.

DSCN4652
The personal information here was altered for the pictures, that's not my address but bonus points for anyone who knows what IS at that address. 

DSCN4631
Here's a side view of the card so you can see that the moon actually stands away from the card.

Now that you've seen how it turned out, I'm going to walk you through how I made the pop up portion of my card.

I like a really professional looking invitation so I always use the computer to print them out. I created my own template that I'll share if you're interested, just shoot me an email at julie at buildsewreap dot com and I'll email it back to you. Here's what it looked like on my screen:

DSCN4634

The blue dotted lines are lines within a table I created that won't show up when I print. The solid lines are lines of the table that indicate to me where to cut or fold. I set those lines to be a really pale grey so I could see them but they are hardly noticeable if I don't manage to cut exactly on the lines. My template creates two cards per page. I'm using silver cover stock paper from Paper Source. I printed out a page and cut one of them out.

DSCN4632

I discarded the extra pieces (right into my recycle basket so I can use the scraps of this awesome silver paper in another project) and began the folding process.

1) Fold the tab down.
DSCN4635
                               
2) Fold the tab back up on itself.       
   DSCN4636

3) Fold the last bit of the tab down.
  DSCN4637  

4) Glue the piece down to the main body of the card.
  DSCN4638

5) Glue the part you see here that's purple.
  DSCN4639  

6) Lay down the object you want to pop up face down in front of the tab.     DSCN4641

7) Press the glue down onto the back of the pop up object.
DSCN4642

8) Glue the piece of the tab you see here.
DSCN4643

9) Press the card closed and hold it for a moment or two to ensure it sticks.
DSCN4647

10) Open back up and admire your handy work!
DSCN4652

So there you have it, a pop up moon card. You can place just about any flat object there and it takes your card to a whole new level. I saw a lot of tutorials that show you how to cut the main body of the card to create a pop-up but I didn't want to cut into the black. I hope this gives you some good ideas!

Thank you for reading,
Julie


This post was shared on the Make & Takes Spotlight
Make and Takes
Related Posts Plugin for WordPress, Blogger...