
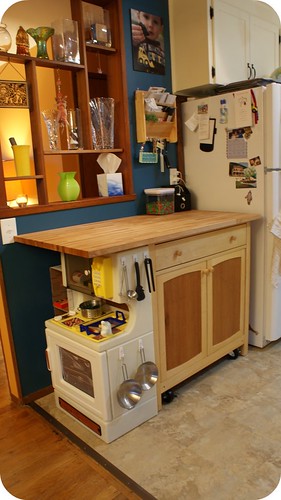
I've had a kitchen island cabinet with me for years. I bought it a long time ago from Target when I needed a bit of extra storage space and it has followed me around and continued to look good wherever I was. When we moved into our current home almost 2 years ago, one of the first things we did was to remove a low counter area in our kitchen. Having been built in the 60s, I can only assume that counter space was intended as the home office but it was barely big enough to hold a computer much less a printer and all the other gear I have attached to my PC so we yanked it out and slid the cabinet into its place. It was only about 18 inches deep though so I found it really just collected stuff as it wasn't a useful counter depth.
I found myself dreaming of a bigger cabinet but couldn't bring myself to drop the $300+ on what I wanted. I wanted it to have a bigger top and be on wheels but otherwise it really was a fine cabinet. As my DIY brain started to think about how to make it better, I realized it might be kind of neat to have the top overhang in the back then put the whole thing on wheels and someday get some bar stools so when I have big cooking projects to do, O could sit on the other side of it and do crafts or help me. I had visions of us happily making all sorts of things on my new rolling island.
Then I saw a butcher block top at Ikea, got a gift certificate for Ace Hardware for Christmas and here's the end result:
That's how it sits from day-to-day but if I want to roll it out, it would likely sit like this:
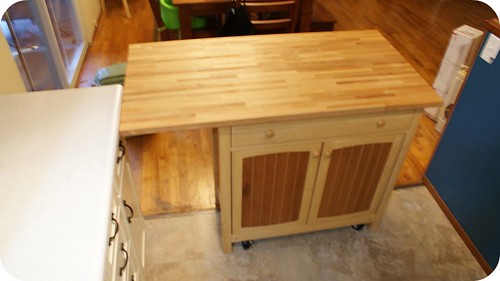
I'm pretty excited by all the extra surface area. Our kitchen is very small which makes big cooking tasks a bit of a challenge. I'm very happy with the results.
In case you're interestd in how I did it, here's a little tutorial.:
Materials
-Island (the base furniture)
-4 appropriately sized wheels. You can find out how much weight they'll support by reading the tag on the item or possibly on the product label in the store. I believe each of my wheels here supports 250lbs. I keep all our kitchen appliances in that cabinet so I wanted to make sure it was sturdy. (Around $10/wheel)
-1 butcher block top. I got ours at Ikea for $40
-Butcher block conditioner (Ace hardware for around $10 for a supply that will last a few months)
-Bolts for the wheels (had them on hand)
-Scrap wood if you need to reinforce the base where the wheels will go (had it on hand)
I flipped the unit over and pieced in scrap wood because the bottom of my unit was a thin plywood that I didn't think would hold the wheels. I glued the pieces in place inside the corners then used wood screws to attach them to the sides as well as the existing base. When that was all set, I bolted down the wheels. I first checked to make sure they would be a bit longer than the existing legs as I wanted the unit to still look like it was on legs but needed them to skim the floor.
The hubs helped me flip it back over so I could remove the old top. The old top was held in place by cam bolts and pegs so it was easy to remove. If you can't remove yours, you can certainly opt to just put the new butcher block top right over the old top. Screw the top in from the bottom and you've got yourself a new cabinet with a useful top and it's all on wheels.
Don't forget to condition your butcher block using the instructions provided on the container.
This project cost me around $90 (butcher block top, wheels and conditioner). I was fortunate to have some gift certificates that covered all costs but would have paid this out of pocket in an instant knowing now how much it improves the flow and usefulness of our kitchen.


I just found your link on I am Momma Hear Me Roar... I have been lost in your update for the last hour! I love it- The cabinets look amazing, what an inspiration :) I just want to go in and organize mine now, I want my kitchen to look as smart as yours! Thanks for the eye candy!
ReplyDeleteBecky - thank you so much! What a wonderful compliment to receive. I'm happy to report too that the kitchen still looks great a year and a half after redoing the cabinets. They're easy to clean and it still looks bright and fresh. Unfortunately the rolling cart still collects crap but I clear it off occasionally to use it when I'm doing major cooking projects so I still love that this change worked out so well.
ReplyDelete