
Materials:
- 18 inch wide strip of sturdy plywood - length depends on your needs, mine was 7 1/2 feet long
- 18 inch wide strip of Thrifty White Hardwood Panel (or something else long enough and slippery)
- 2 8-foot long 2x4s - these can be basic studs, no need for fancy materials but make sure you get straight ones with few blemishes that you'll have to sand out. These will be the edges of the slide so you don't want them splintery.
- 4x4 for base of slide
- Adhesive
- Optional: Wood shims
Equipment:
- Table saw
- Dado Set (or a lot of patience to run your 2x4s through multiple times to create a wide enough slot for the plywood and hardwood panel to sit in)
- Miter Saw
- Hand sander
Using your hand sander, make sure all rough knots and edges and any potential splinters are well smoothed out of the 2x4s. Next, prime and paint them. It's much easier to do it now than later.
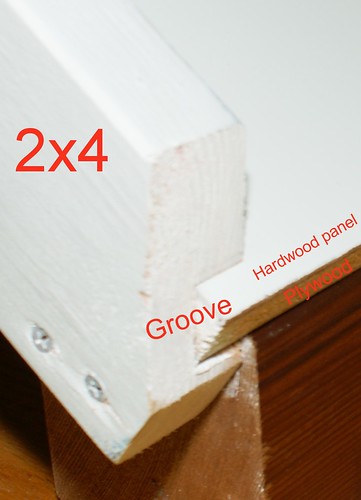
Stack your plywood and hardwood panel together and measure how thick they are.
Stack your plywood and hardwood panel together and measure how thick they are.

We used 3/4 inch thick plywood and the hardwood panel was 1/8 inch thick so I set the dado to cut a 7/8 inch thick groove.
Set your dado blades to that thickness and cut a 1/2 to 3/4 inch deep groove down the center of your 2x4s (long ways, the entire length of the 2x4).
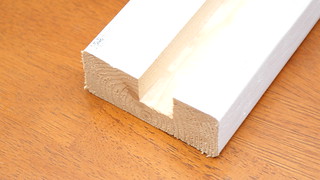
Cut all your pieces to length. You can angle what will be the bottom ends of the 2x4s if you can figure out what that angle is. I guessed and it turned out alright. I'm sure it would look just fine not to angle them as well.
Squeeze a generous amount of adhesive into the groove on one of the 2x4s and slide the stacked plywood and hardwood panel into the groove.
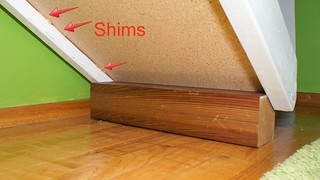
Add shims in the groove on the back side if necessary to ensure it is nice and tight.
Repeat with the other 2x4 on the other side of the plywood/hardwood stack.
Allow the adhesive to set over night for best results.
If you want the base of the slide to end above the floor by a few inches, the last step is to add a piece of 4x4 to the bottom. I used a scrap piece from when I ripped something out of the kitchen. I liked that it blended with our hardwood flooring. I got it in there at the right angle (more guessing I'm sorry to say) and added 2 screws in to each side before putting the slide in place.
Squeeze a generous amount of adhesive into the groove on one of the 2x4s and slide the stacked plywood and hardwood panel into the groove.
Add shims in the groove on the back side if necessary to ensure it is nice and tight.
Repeat with the other 2x4 on the other side of the plywood/hardwood stack.
Allow the adhesive to set over night for best results.
If you want the base of the slide to end above the floor by a few inches, the last step is to add a piece of 4x4 to the bottom. I used a scrap piece from when I ripped something out of the kitchen. I liked that it blended with our hardwood flooring. I got it in there at the right angle (more guessing I'm sorry to say) and added 2 screws in to each side before putting the slide in place.
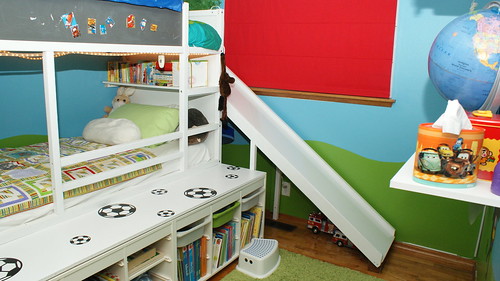
For more information on how the slide is supported and how to build out an Ikea Kura bed like this one, check back on the blog in a few days for full specs.
Thank you for reading,
Julie


What a fun bed! I just love this!
ReplyDeletehey Julie, i love the slide! I am doing something very similar for my son but i am stumped about how to attach the top of the slide to the platform. any ideas or pictures you could share would be much appreciated. thanks!
ReplyDeleteHi Katie - sorry for the delayed response, hopefully it isn't too late. Did you see that I have additional pictures as well as some info in another post about how the whole bed and slide came together? Here's the link: http://www.buildsewreap.com/2012/05/bed-to-beat-all-beds-specs.html
ReplyDeleteIf you still want some more photos, please feel free to email me directly and I can take some with my phone and email them to you.
I can't check at the moment (the little dude just went to bed) but I'm not even positive the slide is actually attached to the platform. I think I have the slide so totally secured to the wall and the bed that I didn't need to also attach it there. If you really need to attach the two together, I would suggest maybe using some hinges mounted underneath. I would do that if they were the only things supporting the weight of the slide and a child on the slide but if you're just trying to marry the platform and a self-supporting slide together to ensure they don't slide apart, then I think some hinges would work well.
Thank you for this DIY post! It helped guide us for our own slide project.
ReplyDelete