
That's what brought me to design my latest Ikea hack - the changing station.
We've found that Ikea furniture is fantastic for Snickerdoodle. It is sturdy and attractive but also wipes clean easily. In this post, I'll walk you through how to build your very own changing station out of simple Ikea furniture.
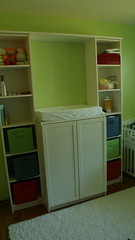
Here's what you're working towards (larger version below):
What you'll need for the basic setup (not including accessories):
- 2 shelf Billy Bookcase $39.99
- Billy Olsbo Door (x2) $30.00 ea
- Tall narrow Billy Bookcase $39.99 ea
- Contoured Changing Pad (30 inches long) $35.00 (we had this on hand)
- 64 x 12 piece of white shelving - or you can paint it yourself est $15.00 (we had this on hand)
- 31.5 x 18 piece of white shelving est $15.00 (we had this on hand too)
- 2 small L brackets
- 1 scrap 2x4 at least 16 inches long
- Industrial strength self adhesive Velcro
- Screws
- Optional - 2 scrap pieces of no slip shelf liner
1) Put together all the Billys and put the doors on the 2 shelf bookcase.
2) If you're at all concerned about scratches on top of the shorter Billy, fold some no slip shelf liner and place it on top.

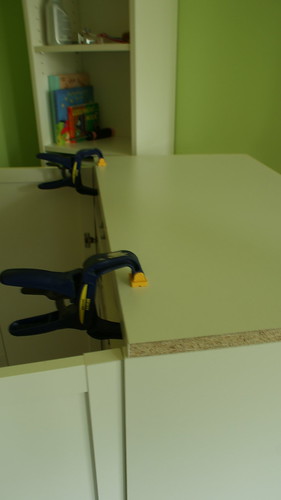
3) Place your 31.5 x 18 piece of white shelving on top of the bookcase lining it up with the front edge. I used clamps to hold it in place for the next step.
4) Now attach your two small L brackets to the back of the side pieces of the Billy and the underside of the changing table top. I can't find my picture of this step, please forgive me.
5) Once that's secured, push the Billy with the new top up against the wall, check to ensure it is level from front to back and mark a line on the wall UNDER the tabletop.
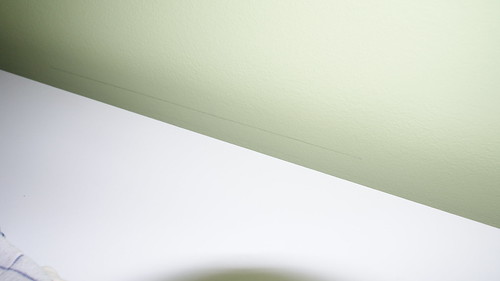
(I pulled the little Billy back out for this picture)
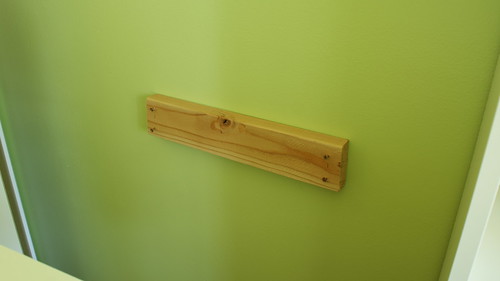
6) Attach your scrap piece of 2x4 to the wall under the line. I found my studs and screwed into them which was why I suggested your piece be at least 16 inches wide (houses are built with the studs set at 16 inches apart). If you're unable to screw into a stud, you'll need to use molly bolts or something similarly strong.
7) Now push your short billy into place with the top resting firmly on the 2x4. If you want to further strengthen the setup, feel free to screw down through the top of the table into the 2x4 but I will say we didn't because I don't see that Billy moving any time soon.
8) Slide the two tall Billys on either side of your new changing table and secure them to the wall with the hardware provided (L brackets).
9) Place the 64 x 12 piece of white shelving across the very top of the two tall Billys and secure it down with Velcro at either end where it comes in contact with the top edges of the bookshelves.
10) Place one or two pieces of Velcro on the changing table top and secure down the contoured changing pad.

Now accessorize as you see fit. I'm going to address our accessories in part 2 of the Ikea Hack Changing Station series including some pieces you don't see here.
I hope this gave you some ideas for how you can make a changing table that will be useful for many years to come. I intentionally didn't mar the surfaces of any of the three bookcases with hopes that someday we can take the changing table top off, push little Billy back against the wall and use all three for books and toys instead of diapers. The changing surface is high so this wouldn't be ideal if you're particularly petite but I'm 5'6" and think it'll be fantastic.
All-in-all, this cost us around $140 because we had quite a few pieces on hand. Knowing that many good changing tables run that much or more (for the ones that last beyond 6 months), I'm pretty thrilled with how we spent the money.
Thank you for reading,
Julie


Loved your blog page!!!The stuff that you have remarked up here is superbly wonderful and I vigorously thank you for the same.classic adirondack chair
ReplyDeleteDefinitely a great project you did here. Ikea is no doubt a popular brand name in the home decorating world and there are many home decor lovers love to get their furniture or other decorating items from here. In this post the hack changing part 1 you describe was extremely a sweet read. Love it very much. By the way what's your recommendation for modern office furniture? Thanks for gifting us the future update.
ReplyDeleteThis is a clever and practical solution for creating a changing station.
ReplyDelete