
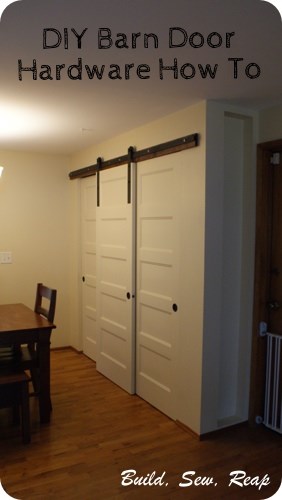
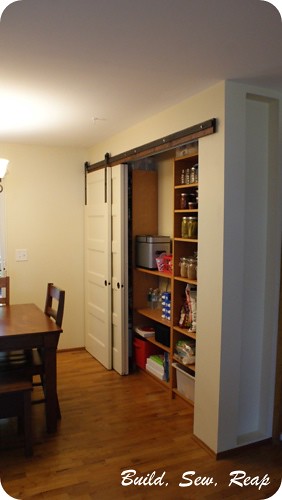
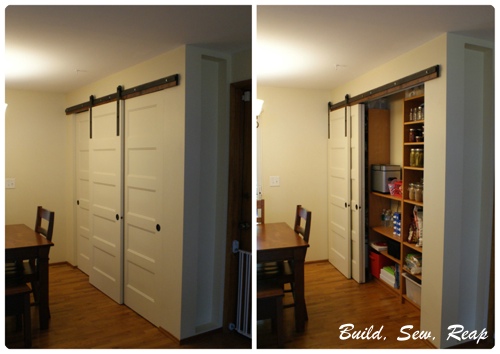
I also wanted all three doors to roll to one side or the other so I could get to the maximum sized opening possible when I need to access the food inside.

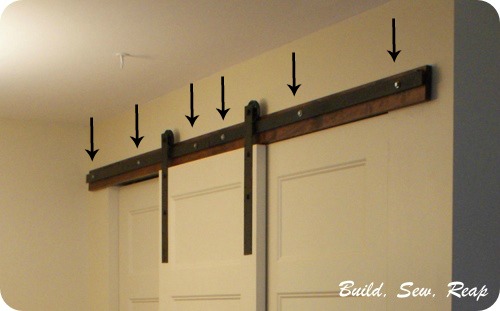
Let's start with just the track setup.
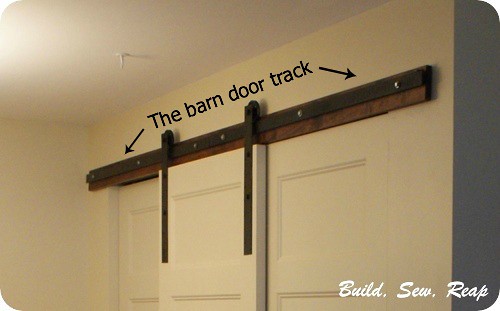
My track is 96 inches long, I wanted it to run wider than the actual opening of the pantry.
Materials:
- 1 - 8 foot long 1x4 stain-grade lumber
- Stain of choice
- 6 - 4 inch long screws that match the stain on your wood
- 2 pieces of 4 feet by 1 1/2 inch by 1/4 inch steel (Lowe's or Home Depot). NOTE, this must be 1/4 inch if you're going to use the same garage door pulley I'm recommending. Of course, if you can get an 8 foot long piece that's 1 1/2 inch by 1/4 inch thick, go for that instead.
- 6 hex lag screw - 4 inch long, 1/4 inch diameter
- 30 standard washers - fits over 1/4 inch bolt/screw
- 6 fender washers - fits over 1/4 inch bolt/screw but larger outside diameter
- 2 strong nails, at least 2 inches long
- Black spray paint (if you want the look I used)
Next came the actual steel track. It consists of two pieces of steel that I purchased at Lowe's that I spray painted flat black. Each piece is 48 inches long, 1 1/2 wide and 1/4 inch deep. I used my regular cordless drill and a good bit to drill three holes in each piece; 4 inches from either end and in the center.
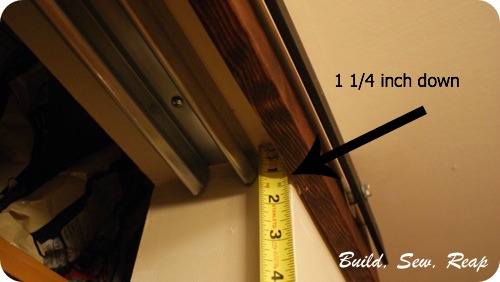
Using lots of clamps, I positioned the steel bars one at a time, end-to-end and marked where I would need to pre-drill through the wood. I positioned the bar 1/2 inch down from the top. I liked the way this looked and it allowed ample clearance for the bolt that will go through the center of the wheel.

I took the steel back down and drilled 1/4 inch holes through the wood and into the studs (where I hit them). Since I screwed the wood into the studs in an earlier step, it isn't as necessary that the steel be attached to the studs, as long as it is securely attached to the stained wood piece.
Next, I stacked my materials as follows for each screw:
- One four inch long, 1/4 inch hex lag screw
- Standard washer
- Steel bar
- FOUR standard washers
- One fender washer
- Wood
The goal here is to have the center of the track as close to 3/8 from the wood as possible. This was what I determined would make my 1 3/8 inch thick hollow-core door hang straight and glide easily without hitting the other doors. I did a little bit of experimenting with this so if you're using the same materials I'm using, save yourself the balancing act.

I found that I needed to get each one started just a little bit before I could tighten them all down. Remember also that you will have a little bit of wiggle room as you're tightening so take care to ensure your two tracks are perfectly aligned and butted up tightly against one another. I tapped mine with a hammer before fully tightening down all the screws and my doors glide easily over the intersection.
The last step is to create door stops. I wanted something really subtle so I used a nail that I tapped in until I felt like it was really secure and then I used a hack saw to cut the nail off and I painted it black to blend.
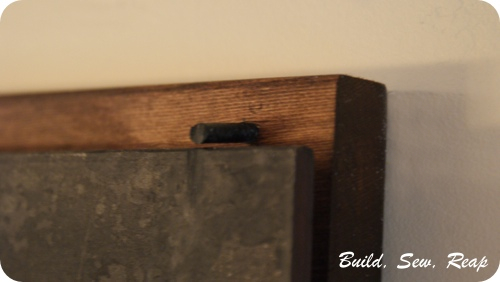
If anyone gets up a bunch of speed with the door, it will fly off the end most likely but I felt like it was secure enough in our household. If you don't feel like this would work in your home, perhaps try using an L bracket to stop the wheel.
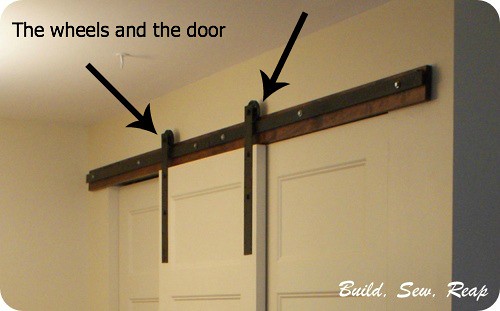
Now let's move on to the wheels and the door
Materials:
- 2 - 3 inch garage door pulley kits - This idea came from ShabbyLisaW
- 6 standard washers to fit over the bolt included in the pulley kit
- 2 - 18 inch long by 2 inch wide steel flat bars (or 1 - 36 inch long one and a good hack saw)
- 4 - 1 inch long by 1/4 inch hex lag screws
- 4 standard washers to fit over the 1/4 inch hex lag screws
- Flat black spray paint (optional)
- Brown spray paint (optional)
- Glue that can adhere metal to wood
I spray painted all the bolts, washers, wheels and flat bars with a flat black spray paint then just lightly dusted over that with brown to soften the look a bit. Once the paint is dry, assemble the setup as follows:
- Bolt from pulley kit
- Standard washer
- Steel flat bar
- 2 standard washers
- Pulley wheel
- Nut included in pulley kit
The goal on this one was to set the center of the wheel 5/8 inch away from the flat bar.

Next, I used clamps to position the bars on the door while in place. I checked to ensure it rolled smoothly from end-to-end, appropriate gap under the door (matched the other doors) and that it looked good from afar.
Once I liked where it was, I marked the placement very carefully, took the door off the track, and removed the clamps. Then I glued the bars to the door as marked and clamped them back down. Finally, I pre-drilled and screwed the 1 inch lag screws with washers into the door. The lower two didn't make a great connection but they went through glue so while they aren't highly functional, they are stuck in there for good.
I allowed the adhesive to dry per the instructions on the container then removed the clamps and hung the door.
HINT: If you find that you didn't get the bars glued into place exactly right and need to adjust how the door hangs, try loosening up the bolt through the pulley and adjust from up there. There is a little bit of wiggle room there.
Now stand back and enjoy how awesome your new barn door looks!
Thank you for reading,
Julie
I'm sharing this post at the following link-up parties:


I love how this looks Julie! Might I bring you coffee one of these days and see it in person? It's been too long!
ReplyDeleteAbsolutely, I'd love it and no coffee necessary. We'll set something up. I need to meet that little nugget of yours. :)
ReplyDeleteThis is a brilliant idea! Especially since my kids are always so rough on their hinged closet doors. This seems like a more viable solution...love it!
ReplyDeleteHe's more of a big nugget these days but YES!
ReplyDeleteAbsolutely brilliant!!! And what a great tutorial, thank you so much for your time and effort (must have taken you nearly as long as building the whole thing)! I'm going to print this out and take it to all the stores until we've found everything we need! We nearly gave up on the whole idea, so thanks again for all the details and pictures! Really appreciate it!!!
ReplyDeleteThis is truly amazing! Love your instructions--I'm sending them off to a friend!
ReplyDeleteHi Mia - can I ask how it went? Please let me know if I left out anything important or if I can improve my instructions. It was so much information and, of course, I didn't get from point A to C via B, I pretty much explored every option and had a lot of fails along the way so I had to reconstruct the wins in this post. Feel free to email me directly at julie at buildsewreap dot com too.
ReplyDeleteThanks Tonia - I'd love to see pictures if you give it a try. I have two VERY rambunctious boys and I haven't sweated them using this once. I'll even go so far as to say I put some of their craft things in the center so they're in and out of the pantry daily. I completely trust the construction. If you do it for kids though, make sure you put really good stops in at either end so they can't get up a bunch of speed and send the door flying off the track. It hasn't happened here and I don't think it will but you wouldn't want to miss that step or try to cut corners on the stop.
ReplyDeleteHi there! Love this tutorial!! I was wondering how you prevent the doors from swinging/clanking together? Do you have any sort of guides or rubber stoppers on the back of the doors? Again, love the tutorial!
DeleteThanks Michelle!! I hope it's helpful. I'm still so in love with my pantry. It is so much more interesting than the paper piled desk that used to sit over there. That desk is now in a new great space too so we had several layout upgrades as a result of this build. It's so wonderful to have a safe place to store the bounty I preserved from our big garden this year too.
ReplyDeleteThis is awesome! Do you think the track could hold two doors or would that be too much weight? So if you were replacing hinged closet doors and needed something two-doors wide could you put two doors on that track, using 4 pulleys? thanks!
ReplyDeleteHi, thanks for stopping by! I do think the track would be plenty strong to hold two doors but they won't bypass each other so if you need two doors, I would put one on a regular sliding closet door track just inside the doorway as I did for my 2 inner doors. You want them to be able to slide off to one side or another stacked against one another. Does that make sense?
DeleteJulie, this looks so great the instructions looks so doable I am very appreciative that you put this together. I have a question, if there is no door behind you were existing barn door do you find that it tilts back on the bottom if it's gently nudged. The reason I ask is because I'd like to use the system using two doors and four pulleys to separate two rooms. My worry is that because there will be nothing behind the doors, it may sway, if it is gently nudged and come off the track system. Have you found this to be any worry?
ReplyDeleteHi Lexi, thanks for stopping by the blog.
DeleteThe doors do swing a bit but I've never had ours even come close to sliding off the track. Because of the shelves inside, it can only swing about 6 inches that way. I just gave it a good pull the other way and honestly, the door is heavy enough that I doubt very much it would fall off the track. This is not a scientific answer, merely an estimate based on my experience. If you make sure you use the proper number of stacked washers to ensure your door hangs vertically, it should look and function correctly.
Perhaps you could look around at the expensive options to see where differences might occur. Are the rollers deeper? Is there a bottom guide? Then use your best judgment to decide if this would work for you. I wish I could offer a definite yes or no.
Oh, I have kittens and small boys and none of them have successfully derailed the system although they've sure given it a run for its money.
knocked me socks off girl!
ReplyDeleteLove this, am going to put it in my entry. Question. how big is the gap looking from the other direction? It must be somewhat larger as I understabd the two doors 'bypass one another, correct?
ReplyDeleteOMG, you rock. I have been wanting to do this to a closet that I'm using as a pantry, closet and storage area combo. The space is currently set up as a closet with two bifold doors and I wanted to widen the space to set up my "combo" idea but couldn't decide on the door configuration. This looks perfect for the space. I the area is just off my kitchen before entering the family room so I think I'll add black chalk paint to one of the doors and peg board to the other and turn this into our communications center. I'm excited I ran across your blog and can't wait to get started. Thanks for the idea and great detailed instructions. I'm a firm believer that girls rock and are my part of my proof. Thanks again, Pam
ReplyDeletePlease come to California and do this at my house!
ReplyDeleteAmazing! I have been trying to figure out how to turn my closet opening into a triple sliding door and this is perfect and exactly what I was looking for. Thanks you!
ReplyDeleteHi great tutorial! I have a quick question. Did you install the bottom piece for the closet system? I dont see it in the photos. If you didn't are the doors still sturdy?
ReplyDeleteI really like that sliding barn door. And many thanks for the images and installation instructions. These instruction will help me install my door easily.
ReplyDeleteI am impressed by the quality of information on this website. There are a lot of good resources here. I am sure I will visit this place again soon. Garage Door Repair & Installation Services In West Hollywood
ReplyDeleteI actually tried something similar to this but completely failed! Maybe buying a cheap door track could be it, anyway I think after looking at this I'll give it another go!
ReplyDeleteIt is my first visit to your blog, and I am very impressed with the articles that you serve. Give adequate knowledge for me. Thank you for sharing useful material. I will be back for the more great post.
ReplyDeleteoz automation
Hi Julie,Such a great idea and something I would love to do also! Great job!
ReplyDeleteThat's very interesting, and also your method is efficient than any other professional :) it was a big problem to Sliding Barn on the Door, but not any more Thank you ^_^
ReplyDeleteIf more people that write articles really concerned themselves with writing great content like you, more readers would be interested in their writings. Thank you for caring about your content. patio doors installers
ReplyDeleteNice to be visiting your blog again, it has been months for me. Well this article that i’ve been waited for so long. I need this article to complete my assignment in the college, and it has same topic with your article. Thanks, great share. centralina cancello automatico
ReplyDeleteThanks for posting this info. I just want to let you know that I just check out your site and I find it very interesting and informative. I can't wait to read lots of your posts. buy instagram likes using paypal
ReplyDeletecan you let me know the dimensions of the steel bar at the top? how thick how and how tall. it's 96" wide right. thinking could DIY that steel bar piece also. just need to know the size of that piece too.
ReplyDeleteI impressed by the quality of information on this website. There are a lot of good resources here. I am sure I will visit this place again soon.
ReplyDeleteHaving a biometric access control framework can permit access on a few pieces of the place of business just during available time then from that point onward, it is forever bolted and won't permit access any longer. buy biometric doot lock online
ReplyDeleteA passage entryway frequently is planned as either front doors for sale brought or lower boards up in one or the other vertical or flat plans.
ReplyDeleteNotwithstanding, commonly door injury claims are the consequence of the client inappropriately cooperating with an appropriately kept up and securely working doorway. auto gate remote control
ReplyDeleteThank you for this fascinating post, I am happy I observed this website on Google. Not just content, in fact, the whole site is fantastic. Same Day Locksmiths NW1
ReplyDeleteA trade federation/association. These groups usually have a list of the registered tradesmen in a particular local area. Usually all the members of the association are vetted for honesty, quality of work done and quality of materials used. decorator
ReplyDeleteBefore beginning the repair works, you should check the power supply, because you need continuous power supply to check if your garage entrance is working right. garage door repair
ReplyDeleteHuge numbers of our effects must be put away in the carports because of space limitations. So the insurance of these carports is significant. Aside from the wellbeing of the vehicle, the carports additionally offers assurance to a large number of our valuable things. Garage Door Opener Replacement Phoenix
ReplyDeleteExcellent article. Very interesting to read. I really love to read such a nice article. Thanks! keep rocking.Garage Door Repair
ReplyDeleteSo adorable DIY you have done here for us. It's really difficult to praise your elegant job with proper words. It's totally awesome. The process and efforts your described was notable and worth to try at home. I would like to respect you for this wonderful tutorial. This was very useful for me. But I think it needs much space to roll all three door at one side. Thanks for mentioning the required materials and clean photos. By the way can you please publish a topic on the perfect way for any
ReplyDeletewindow replacement?
Thanks for the blog loaded with so many information. Stopping by your blog helped me to get what I was looking for.Broken Garage Door Spring Replacement
ReplyDeleteA few locks consequently re-lock when you venture through the door. In the event that this is awkward for you, you might need to search for a lockset that will initiate when you advise it to. slotenservice-slotenmaker.nl
ReplyDeleteAlso, you can decide and expect how the door ought to respond to your methodology. In the event that no programmed activities are identified when you are inside a couple of feet of the door then you make the snappy assurance that the door will require your actual effort to work and travel through it. PVC ramen
ReplyDeleteWith high crime rates all over the country, there are a lot of people who feel insecure in their own homes. They worry about being able to protect their homes and their families. It's possible that adding home security doors as additional protection may help alleviate your fears. security doors melbourne prices
ReplyDeleteCustom sliding barn doors are a huge statement decor in luxury homes, be it farmhouse chic or urban minimalist interiors. Custom Barn Doors
ReplyDeleteExcellent article. Very interesting to read. I really love to read such a nice article. Thanks! keep rocking. the site
ReplyDeleteI think typically better than a normal article. You make this information captivating and locks in. You allow pursuers a significant degree to consider and I welcome that sort of composing. House Painting Covington
ReplyDeleteIt might come as an amazement to hear that numerous entryways can be created as sliding entryways. This implies that regardless of whether you see an entryway you like and it's anything but a sliding entryway, you can demand the style be made into a sliding entryway by the maker.telescoping sliding door
ReplyDeleteThese barn doors turned out so amazing! I love them so much. I would love to try and recreate this in my home. We are doing some kitchen cabinet painting this week so maybe once we are finished with that project! Thanks so much for sharing!!!
ReplyDeleteYou have given great content here.Kitchen Cabinet Painting I am glad to discover this post as I found lots of valuable data in your article. Thanks for sharing an article like this.
ReplyDeleteCool
ReplyDelete