
This worked a little bit:

But it didn't hold a whole lot and it seemed like when we really loaded it up, usually one of the chains would break, sending fruit cascading all over the kitchen.
This was another thing we tried but I don't think I have to explain why this isn't ideal:
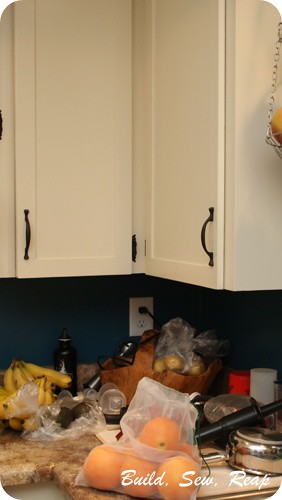
Clean dishes, fruit, appliances ... sure, just toss it all in that back corner.
Then I turned to the new counter area:
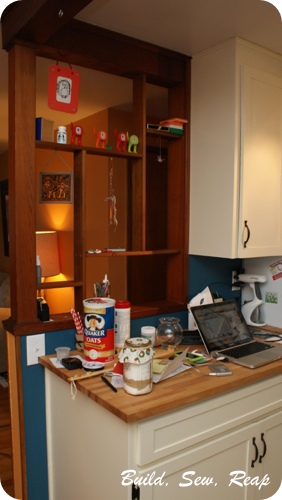
I said to the hubs, "What if we get all the crap off this counter and move the Vitamix over here?"
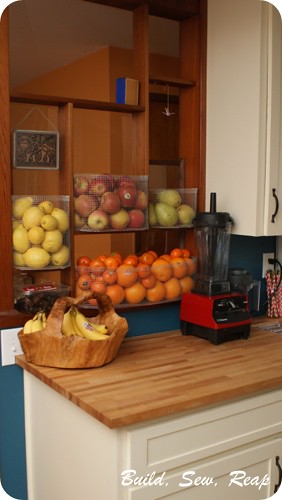
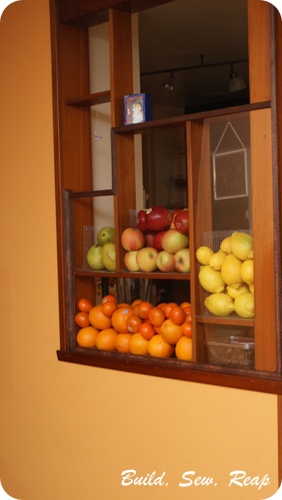
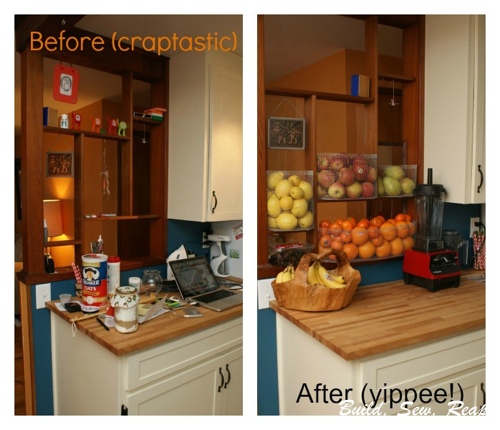
And then it hit me ... what if we used the passthrough (that's what we call that section with the little wood shelves there above the counter) to hold our produce?!?!? We could put plexiglass on the living room side then create bins tilting towards the kitchen side. Not only would it hold a lot of produce but it would look great from the living room side.
I headed off to Home Depot to get materials. As usual, they didn't have quite what I had in mind so I started wandering the aisles (I do love going there after the kids are in bed so I can think in peace). I ended up with a $10 roll of hardware cloth, some industrial strength staples for the staple gun, a bunch of stainable wood trim, a large piece of plexiglass and some stain. OK, I can't lie, it took three trips to HD to get all that stuff (the project just kept changing but that's OK, it is literally 1.5 miles from our house).
Here's the end result:
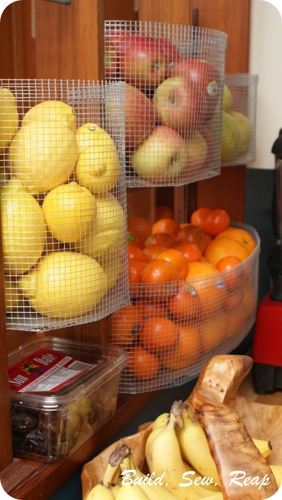
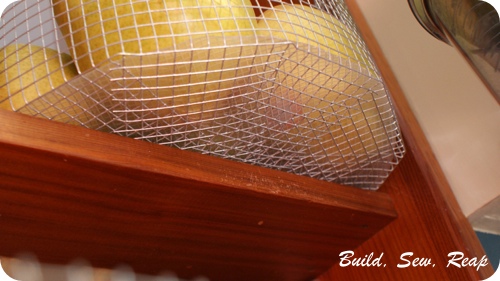
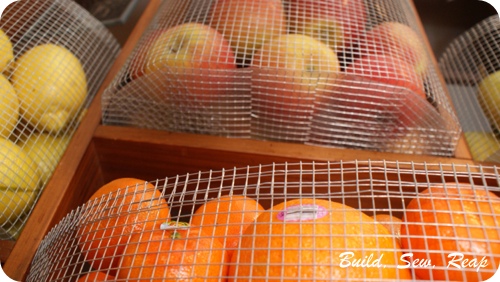
How did I create these baskets? I took some detail photos and can walk you through how I did it using 1/2 inch hardware cloth and some tin snips (you could also use wire cutters but these made short work of the longer cuts).
First, I measured how deep I wanted each basket to be. This was based upon my ability (as the shorter adult in the family) to reach over the counter and into the basket to the level a piece of fruit might be. I then added 1 inch extra to be folded down at the top:

And I added 4 inches extra to be folded in at the bottom to form the bottom of each basket:
I used the existing curve already molded into the hardware cloth from how it had been rolled so I wouldn't be fighting that. Once I had it cut to length, I placed it in the compartment it would eventually be secured to and determined the width of the piece. I wanted each basket to stick out 3 inches at the most so I held it in place and marked where I should cut it for width and used my tin snips to trim it down.
Next, I used my pliers to carefully fold over and pinch down the top edge so there wouldn't be any rough edges to catch our arms as we reached for things.
I then folded the bottom in at the 4 inch mark. I counted in 10 squares from each side then trimmed up to the 4 inch mark with my tin snips. I continued to count 10 squares in on each side from the previous cut until I reached the center. Make sure you work from each side, not just from one side to the other or you may not end up with symmetrical cuts.
Then I used my staple gun to staple the vertical sides of the basket into the wood cubby and carefully layered in the base and stapled the bajeebers out of it so it would stay in place. Finally, I cut non-adhesive shelf liner to fit in the bottom of each basket to keep the fruit up off the wood and away from any possible rough edges remaining in the bottom of the baskets. I used a frosted variety that is hardly noticeable.
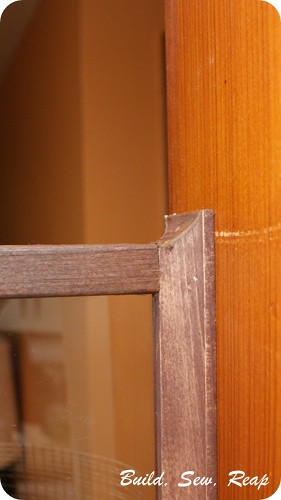
Once the baskets were in place, I cut the plexiglass to size using my Dremel Trio and added trim to coordinate with existing trim. Unfortunately I was unable to get the stain to match perfectly but it is close enough for our house which honestly doesn't have the best lighting so when there isn't a camera flash highlighting the difference, it really isn't all that obvious.
We are so thrilled with how this turned out and I feel like I've found a new medium to work with. The hardware cloth is inexpensive and easy to work with and the results are really lovely. I could see how one could pretty easily create baskets attached to walls and cabinets and many other applications. it is sturdy, affordable and attractive - can't beat that!
Thank you for reading,
Julie
I'm sharing this post here:


Absolutely love! We don't have a great place to store fruit, and garden produce in the summer. Pretty jealous we don't have a pass through!
ReplyDeleteLOVE LOVE LOVE!
ReplyDeleteGreat job! It looks lovely :)
ReplyDeletehow much was the total cost?
ReplyDeleteI don't really remember exactly how much but I used some of a roll of hardware cloth ($34/roll), a piece of plexiglass (est $40), and some trim. I'd guess the whole project maybe ran me around $60. We still love it and my kids always know what's available for snacking.
ReplyDeleteWhat a great idea! Thanks so much for sharing it the Best of DIY party!
ReplyDelete