
This time I'm going to talk to you about the accessories we added and at the end, I'll have a tutorial for a scalloped fabric valance for the top.
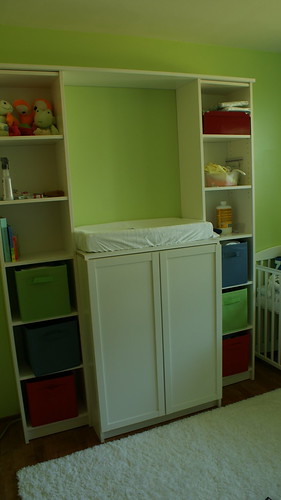
Here's what the changing station looks like now that I'm all finished accessorizing (but not stocking) it:
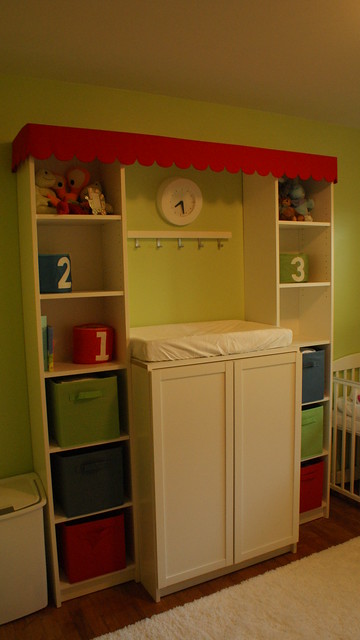
And now I'll break down the pieces:
- 6 fabric boxes from Fred Meyer: $6.99 each at full price (I got them on sale but can't remember how much I paid)
- I picked these because the dimensions were right. The Billy is just 10.75 inches deep so even the Ikea boxes were too deep and I didn't want them hanging out. I believe the packaging indicated these boxes were 10.5 inches deep and wide.
- 1-2-3 bins aka Kusiner Storage Baskets: $4.99 for the set of 3
- Tjusig rack with 5 hooks from Ikea: $9.99
- Tajma wall clock from Ikea: $9.99
- Fabric valance - red fabric, iron-on interfacing and thread (all stuff I had on hand, used a bed sheet)
The fabric boxes were by far the largest expense but we needed additional storage space and they really made sense. Right now I have them packed with things like burp rags, bath towels, bibs and baby toys.
Now for the tutorial for the scalloped valance.
What you'll need:
What you'll need:
- Lightweight fabric - if you don't want any vertical seams, you'll need a long piece for this particular project. I used a bed sheet which ended up perfect.
- Heavy weight iron-on interfacing
- Thread
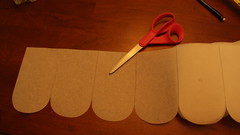
1) Decide on the dimensions for each scallop (what am I supposed to call these things) and create a template on paper. Add an inch or more to the overall length, you can always cut it shorter later if you need to. My piece was 3 1/2 inches wide by 6 inches long.
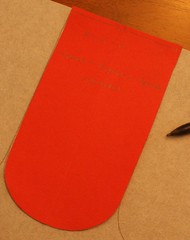
2) Using a roll of stiff iron-on interfacing (or cut strips of interfacing by the yard), trace around the template as many times as necessary for your project. My measurements indicated I'd need 26 scallops to wrap around the top edge of the changing station. I ended up with one loooong piece of interfacing - 91 inches to be exact.
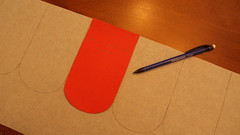
3) Carefully cut out along the bottom edge - DON'T cut up the lines.
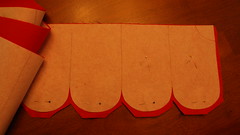
4) Layer 2 pieces of your fabric with right sides together (I folded my sheet along the longest edge) and iron your trimmed interfacing down to one of the layers. Unfortunately this is when I found out my interfacing wasn't sticking very well but I made do with pins.
5) At this point, you just need to cut about an inch below the scalloped edge, it isn't important that you trim to the interfacing just yet. You should trim the top exactly to the straight edge of the interfacing though, especially if you've got a fold there or you won't be able to turn your project after you sew.
6) Using your sewing machine, sew on the fabric right along the sides and scalloped edges of the interfacing trying NOT to catch the interfacing in your stitches. If you do catch it and you're using stiff interfacing, it won't turn as nicely. You'll have an easier time pressing it all flat later if you just sew the 2 fabric pieces together. Also, don't sew the long straight edge, leave that open.
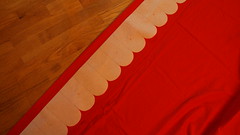
7) Trim the excess fabric and carefully snip up to the stitching at each point between the scallops.
8) Now it's finally time to turn your project right side out. Carefully press each curve out and press with your iron. The stiff interfacing should do most of the work for you in getting the shape just right. I did find that the back side of the scalloped edge didn't look awesome but it's the back and nobody will see it so I'm OK with that.
9) Pin and stitch along the straight edge. I recommend you use a serger for this step but if you don't have one, either use a zig-zag stitch or trim the seam allowance with pinking shears.
10) Fold the top edge back to get your scallops to the right length and to hide the rough edge up top. Secure the piece to your furniture using self-adhesive hook-and-loop tape.
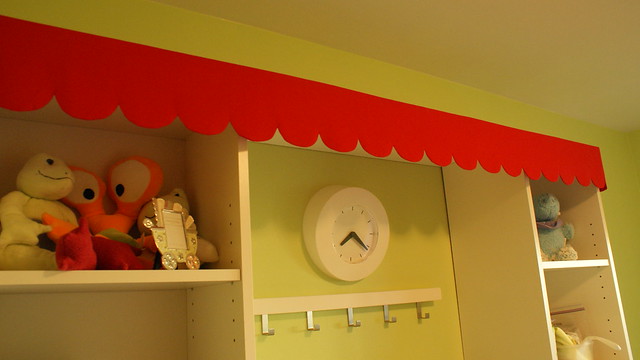
And there you have it - a nice and even scalloped edge valance. It took some doing but I think it's pretty cute and since I hung it with hook-and-loop tape, I can remove it later.
Thank you for reading,
Julie
I'm linking up:


Super Adorable! And your nursery is coming along so quickly now!
ReplyDeleteThanks ggreat blog
ReplyDelete