
Now let's back up a bit.
I've known I wanted to build this structure for a few months. I even bought some of the hardware for it awhile back but I was really having trouble mustering up the courage to tackle it. I knew I couldn't drill the required 1" diameter holes using my cordless drill so I'd have to take out a plug-in drill. That meant I had to take out the generator too. The generator wasn't easy to start here at home so I was dreading the disappointment I'd surely feel after packing up the whole car, driving 1:15 to the mountains, then failing to start the darn thing on my own and wasting the trip. Also, what if I started drilling the holes and the trees somehow resisted my efforts to make huge holes? What if I drilled the holes and couldn't get the bolts into them? After all, I wasn't using giant screws, they're bolts, these were not intended for this application, what if it didn't work? My mind came up with countless reasons why this wasn't going to work out. I really don't deal well with disappointment so I kept putting off this important project. I finished the tree platform and knew I had to just strap on my big girl overalls (Carharts of course) and face it head on.
Today, I did just that.
But first, a disclaimer: I'M NOT A STRUCTURAL ENGINEER! THESE ARE NOT THE RECOMMENDED PRODUCTS FOR SUCH A PROJECT BUT I DID MY OWN RESEARCH AND FEEL THAT THEY'LL SERVE ME WELL BASED ON MANY FACTORS. I AM NOT RECOMMENDING THESE PRODUCTS TO YOU NOR AM I RESPONSIBLE FOR THEM FAILING IF YOU DECIDE TO FOLLOW MY LEAD.
So, I took these big honkin' eye bolts out to the forest (picture taken in my driveway before heading out):
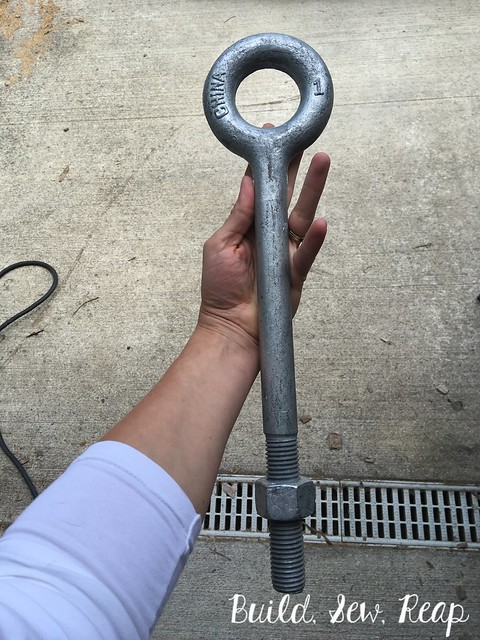
You might be wondering what the dimensions on this bad-boy are. Well, the whole thing is about 15" long but the most important part is that the shaft from the end up to the base of the eye is 12" long. Also, it has a 1" diameter. I won't be using the nut as the trees I'm using are quite large plus the experts don't recommend you drill clear through a tree. My goal is to set each bolt about 7" into the tree.
I loaded up my little SUV including the "portable" generator on the cargo tray. I put the word portable in quotes because the darn thing weighs over 100lbs. That's not portable in my books. Hubs has to help lift it onto the tray which is not at all convenient since we only get to go out together on the weekends and I do the bulk of the work out there on the week-days while the kids are in school.
After dropping the kids off at school, I headed straight into the mountains and arrived just before 10am. I unloaded the car, moved the generator to the ground (ugh, that was no easy task), took some measurements, marked my first hole location, and started to drill.
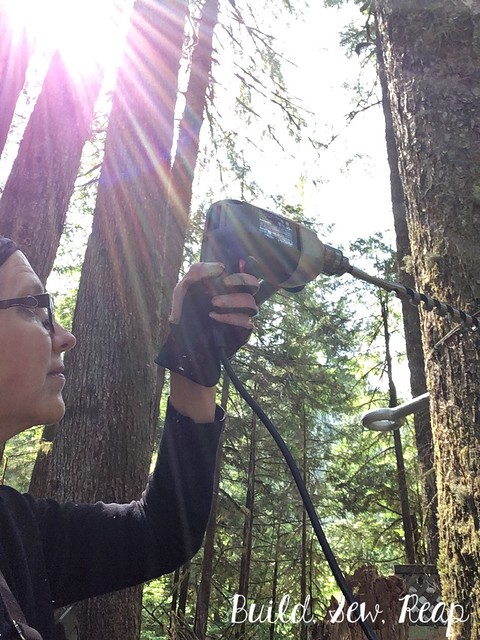
(not actually the first one but it's the only pic I have of me using the drill)
It took about 10 minutes to work the drill bit into the tree the full 7 inches. I stopped periodically to check that the bit was going into the tree straight. I used my small level to determine this. One challenge I faced was the bit kept getting stuck so I'd have to back it out then ease it back in. I worked up a good rhythm by the 6th one. It was hard work but I knew I could get there. If I ever have to do another hole this big, I'm not taking this particular drill though, it wasn't as powerful as I wanted.
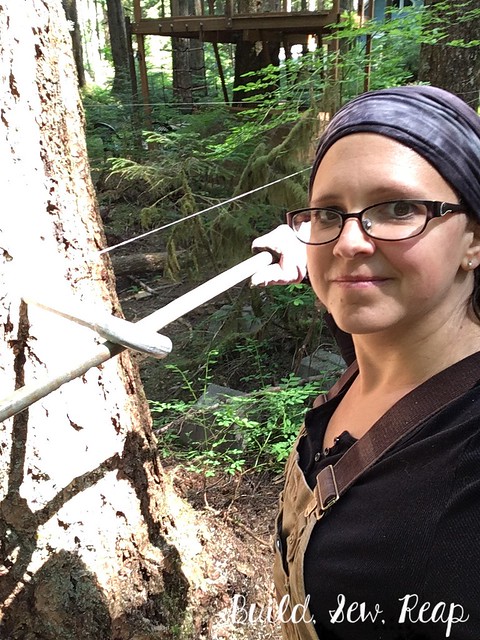
Once the hole was nicely cleaned up, it was time to set the bolt in place. The threads weren't the kind of nice coarse threads you'd want for making short work of this task so it took a lot of revolutions to get it all the way in. I used a 4' long steel pipe for leverage as I was quickly unable to turn the eye bolt without it.
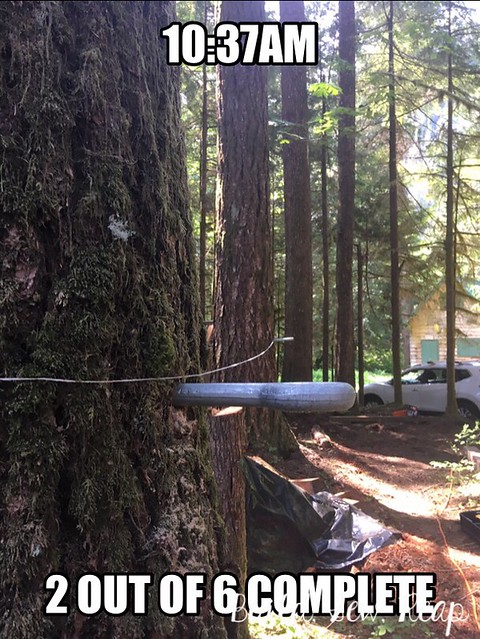
By 10:37, I had installed two of the six bolts.
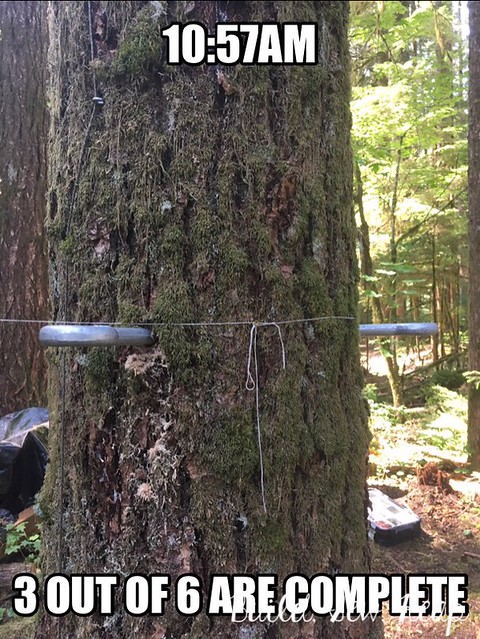
At 10:57, I had completed three of them.
At 11:44, all six bolts were set into the three trees that will support the tree-shed.

I still had an hour and 15 minutes to work before I'd have to pack up and head back to town to get the kids. I decided to tackle the back-up supports for these bolts. My plan was to drill a 10" long 1/2" diameter lag screw in to the tree at a 45 degree angle 4 feet up from each of the eye bolts. Hanging from that will be a turnbuckle which will hold a cable that will be attached to the eye bolt. When these are all tightened into place, they will give the bolt stability and keep it from putting too much pressure on the tree.

I completed one full setup and really like how strong it felt. I also installed three other 10" bolts but have two remaining to complete.
You might be wondering how these will be used. Well, the next step, once I've finished the bolt-turnbuckle-cable sets, will be to set the support beams on top of these huge bolts. There is enough room between the tree and the cable to allow the tree to grow and the beams will somewhat float on top of them to allow for tree movement that won't yank the whole tree-shed apart in a wind storm.
That was my day. I got done more than I honestly thought possible but less than I had hoped but I consider it a huge win. The best part was facing down my fears. I started the generator on the second pull. I drilled massive holes. I installed the bolts into those holes. The trees didn't spontaneously fall down. I didn't hurt myself (much ... ok, so my arms are sort of throbbing but that's not an injury). I'm proud of myself and feel like I accomplished something huge. I tackled a mountain and I won.
Thank you for reading,
Julie


Shhhhhheeeeeerrrraaaaaa!
ReplyDeleteWay to go sista. You are a force of nature.
ReplyDeletethanks for info
ReplyDeleteIt offers a vast collection of free pornography. What’s really surprising is that there are no charges or even a need to register. You can access everything instantly and without hassle. The site free porno videos is very user-friendly and has a wide variety of content to suit different preferences. It’s rare to come across such a comprehensive and accessible site these days. If you’re curious and want to check it out
ReplyDeletelooks stable to me! I'd even be willing to get up there and test it for you!
ReplyDeleteI really appreciate the structured and informative approach of this content. It makes learning simple and effective. Read this article for practical insights. Geometry Dash includes a creative level editor for building custom challenges.
ReplyDelete